There’s a chair in a lot of bedrooms that stopped being a chair years ago. It holds the jeans that aren’t dirty enough to wash, the sweater from last night, the jacket that never made it back into the wardrobe because the wardrobe door doesn’t close properly anymore. Everyone knows that chair.
Most of the time, the problem isn’t that you own too much. It’s that the only place to hang anything is a single rail behind a door, packed so tightly that putting something back is a small wrestling match. That’s where open clothing rack ideas come in, and I’d argue they’re not a fallback for people without a closet. They’re a choice, and often a better one, because a rail you can see is a rail you’ll actually use.
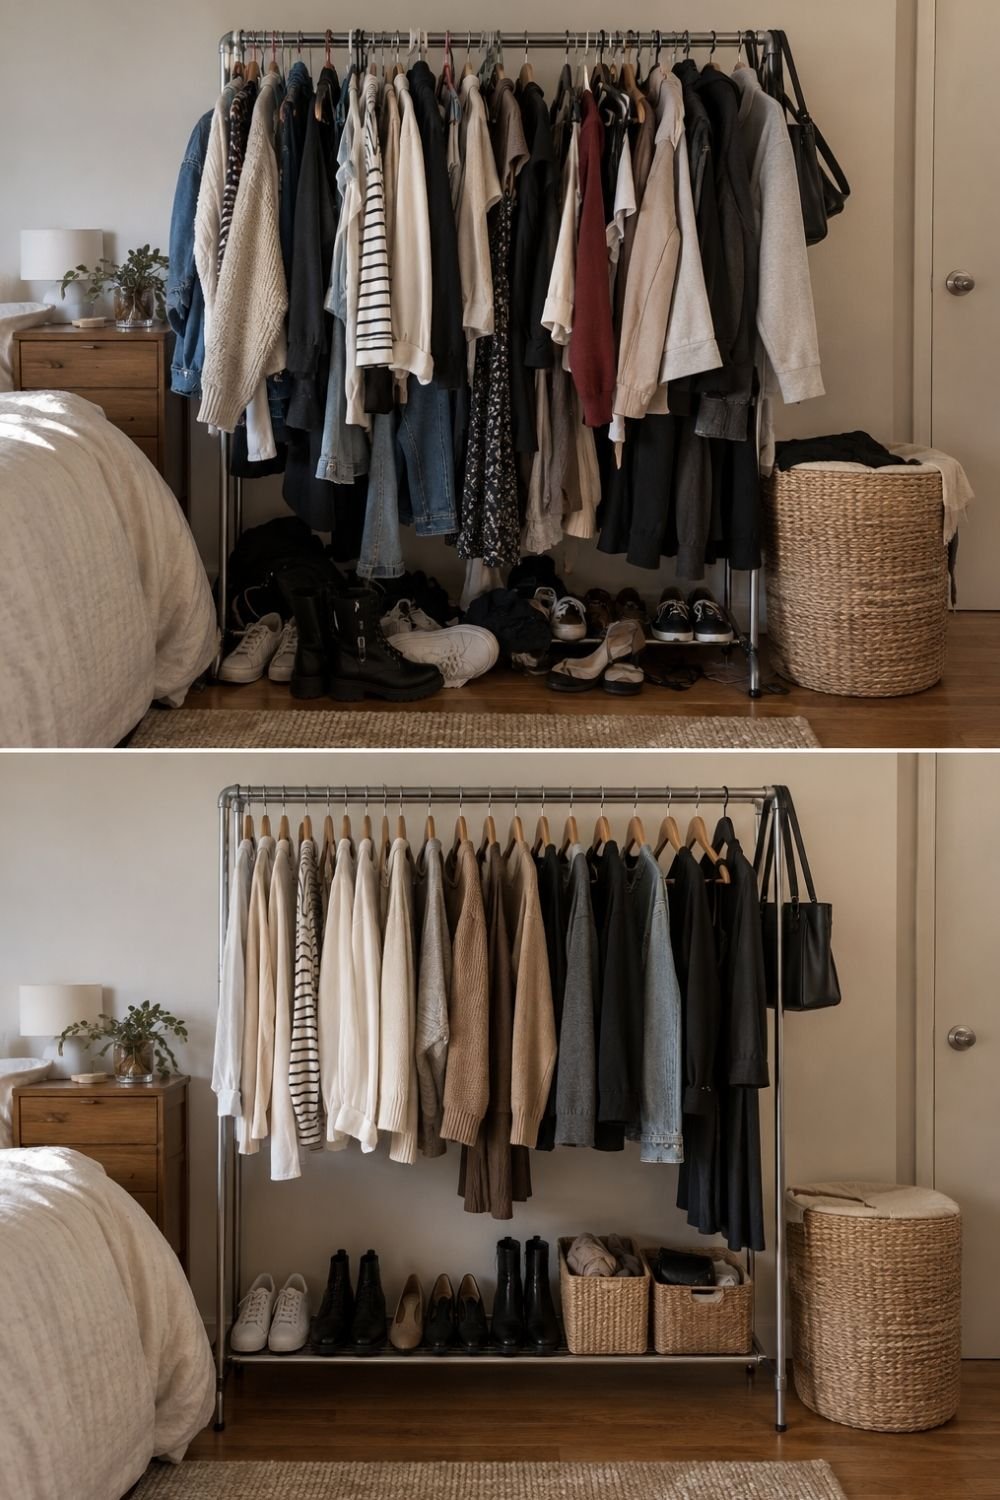
Photo by OurHoneyHome
The two frames above show the same metal rack in the same corner of the same bedroom. In the top one it’s overloaded: forty-odd pieces crammed together in every color, mismatched hangers, shoes in a heap underneath, a bag hanging off one end and clothes spilling out of the laundry basket. In the bottom one, the rail holds maybe twenty pieces on matching wooden hangers, arranged from cream through beige and gray to black, with shoes lined up on the lower shelf and two woven baskets holding the folded things. Same rack, same room, half the clothes. It went from looking like a pile to looking like a small shop.
That difference is what the rest of this post is about: which kind of rack suits which room, and how to keep it on the right side of that line.
The freestanding rack, where most people start
A freestanding clothing rack is the easiest thing to try, because nothing is permanent. You buy it, you build it in fifteen minutes, and if you hate where it stands you move it the next morning. That freedom is worth a lot when you’re still working out how you want the room to function.
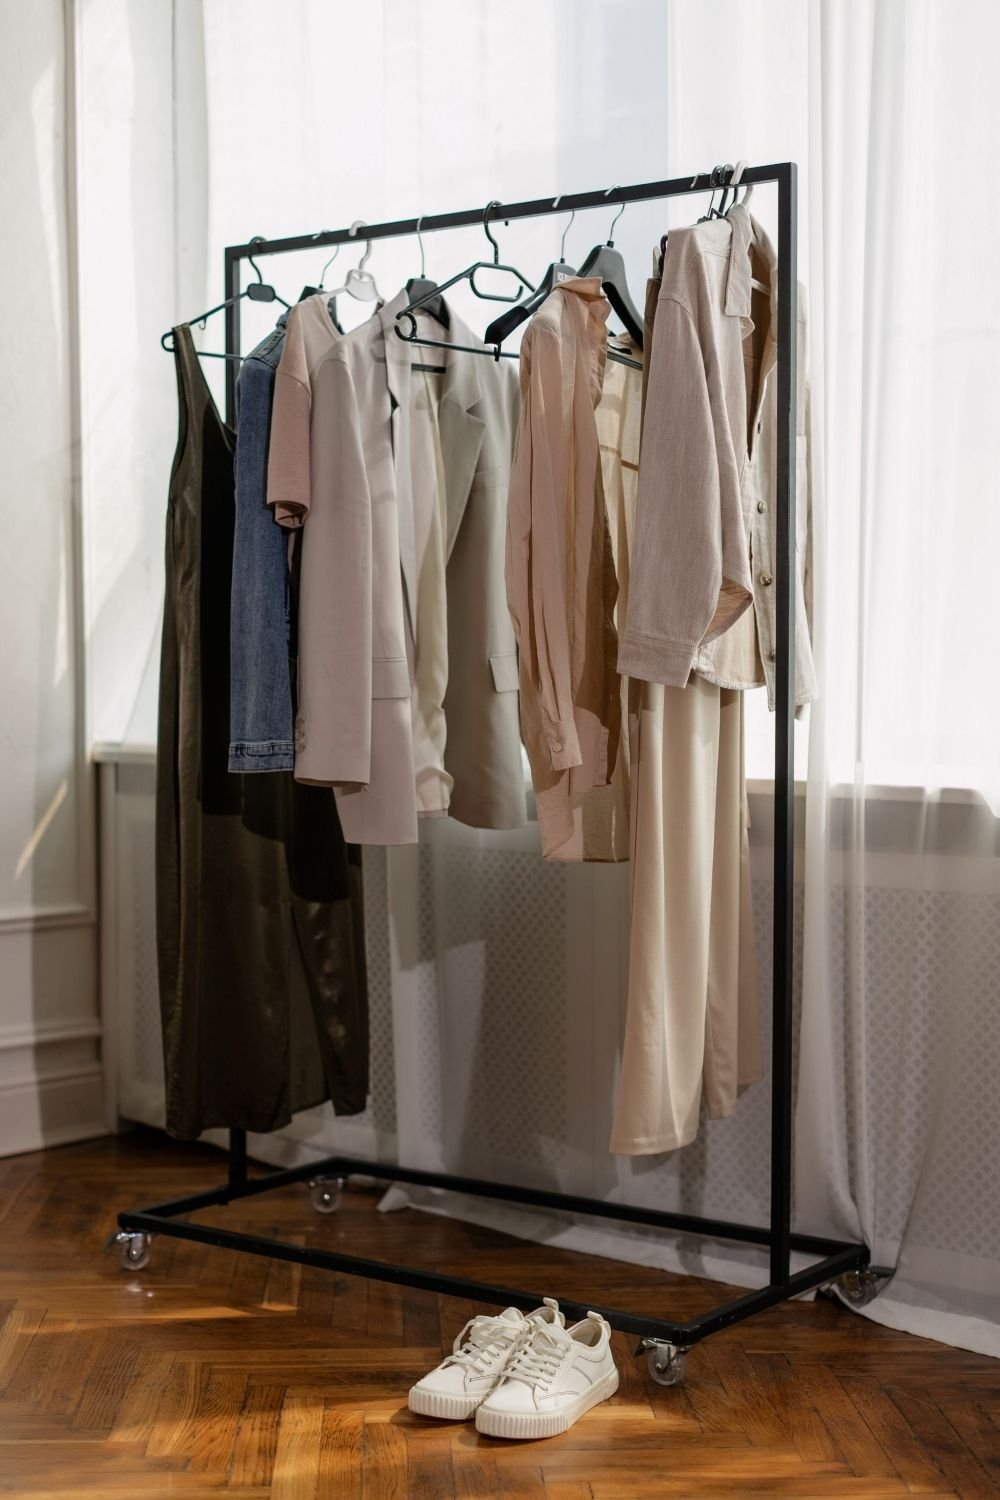
Photo by Alena Darmel on Pexels
The black rack in the photo above is about as simple as they come: a slim frame on castors, holding maybe a dozen pieces in olive, denim, blush and cream, with a pair of white sneakers underneath and a sheer curtain glowing behind it. It reads as a styled corner rather than as storage, and the reason is restraint. There’s daylight behind the clothes, space between the hangers, and a color range narrow enough that the whole thing looks deliberate.
If you’re buying one, the details that matter are less exciting than the look. A rack under about 100 cm wide will sag in the middle once it’s loaded unless the bar is thick. Castors are wonderful for cleaning and terrible on uneven floors, so look for ones that lock. Height matters too: shirts and jackets need around 100 cm of hanging depth, while dresses and long coats want closer to 150 cm, which is why a rack that’s fine for tops can leave a maxi dress sweeping the floor.
Where it stands changes the whole room. In front of a window it becomes a silhouette, and daylight makes even a cheap rack look better, though direct sun will fade dark clothes over time. Against a plain wall it acts like a headboard for the rest of the room. Across a corner it turns dead space into a dressing area. What doesn’t work is putting it in the path you walk every morning, because then you’re brushing past it half-dressed and knocking hangers off.
A wall-mounted rail takes up almost nothing
Of all the clothing rack ideas here, this is the one for rooms where floor space is the problem. Going onto the wall is the obvious answer. A rail fixed to the wall occupies nothing below hip height, which means a bench, a basket or a radiator can live underneath it.
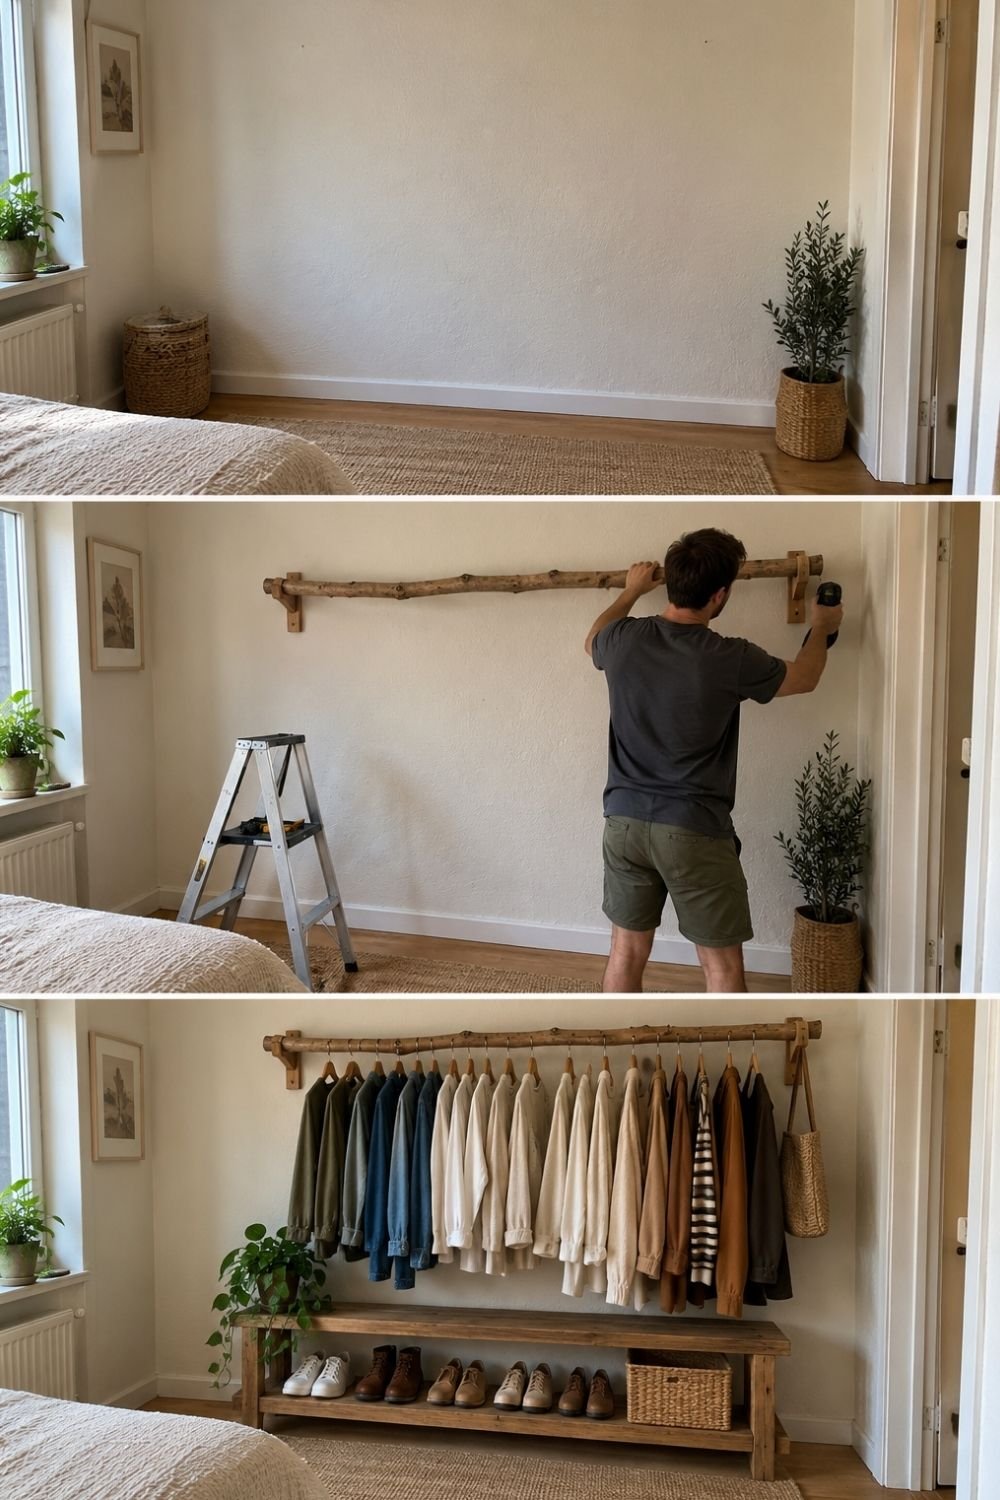
Photo by OurHoneyHome
The three frames above show one going up in a bedroom. It starts as an empty stretch of white wall between a window and a doorway, with a jute rug and a potted olive tree. Then a thick birch branch is mounted on two wooden brackets, drilled straight into the wall, with a step ladder standing by. In the last frame the branch holds a row of shirts and jackets in olive, denim, cream and camel on wooden hangers, with a woven bag on the end, a reclaimed wood bench underneath lined with shoes and a basket, and a trailing plant at one side.
Height is the thing people get wrong. A rail at around 160 to 170 cm lets most shirts and jackets hang clear of the floor while still being easy to reach; any higher and you’re on tiptoe every morning. It also needs proper fixings, because a metre of hanging clothes weighs more than it looks. Into masonry that means plugs and screws rated well above what you think you need; into plasterboard it means finding the studs, since hollow-wall anchors alone will eventually tear out and take a chunk of wall with them.
What makes a wall rail feel intentional rather than temporary is what happens underneath. A bench, a low shelf or a run of baskets turns the wall into a whole dressing zone rather than a floating bar, and it stops shoes from wandering across the floor.
Ceiling-hung and branch rails, when you want it to look like furniture
Hanging a rail from the ceiling is the version that looks the most designed, partly because nobody expects it. A length of pipe or a branch on two chains or leather straps floats in front of the wall, and because nothing touches the floor, cleaning underneath takes seconds. It suits high ceilings, alcoves and awkward corners where a freestanding rack wouldn’t fit, and it’s the one setup that can divide a room in two.
The catch is that it has to go into joists. A ceiling fixing that pulls out is a much worse afternoon than a wall fixing that pulls out, so this is the option where I’d take the extra hour to find the joists properly, or ask someone who does this for a living.
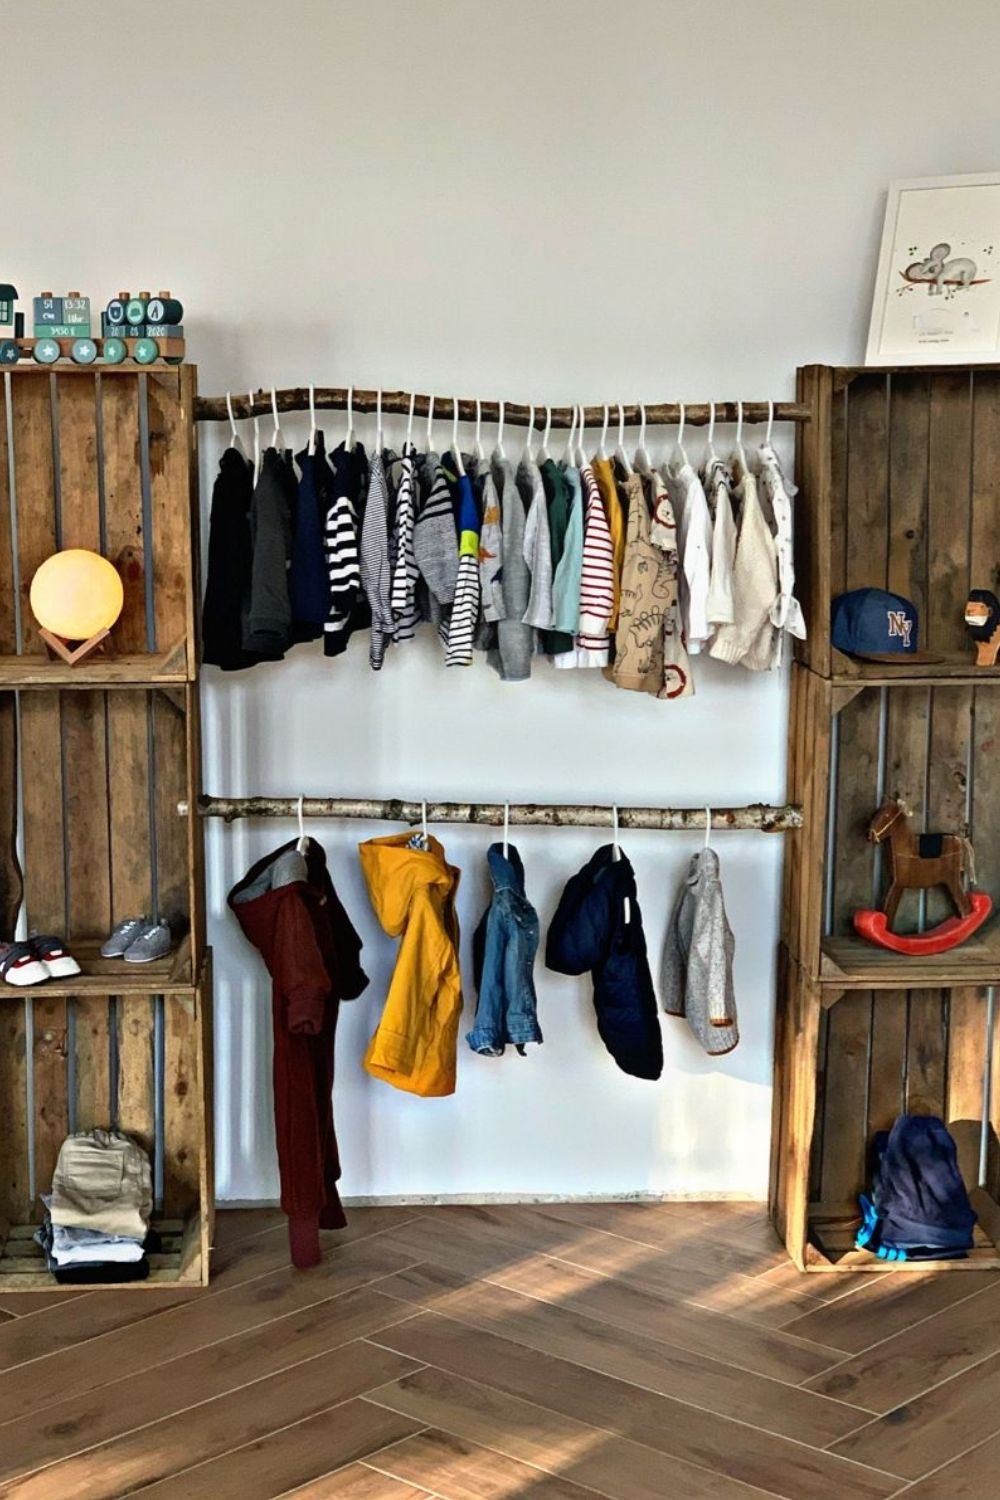
Photo by OurHoneyHome
A gentler version of the same idea is in the photo above, in a child’s room. Two birch branches are mounted across a white wall, one high and one low, between two stacks of old wooden crates used as shelving. The upper branch holds tiny shirts and dresses on white hangers, and the lower one, at toddler height, holds coats and a rain jacket, with shoes, toys and folded clothes in the crates on either side.
That lower rail is the part worth stealing. Putting a second bar at around a metre means small children can hang up their own coats, and in an adult bedroom the same trick doubles the capacity of a tall wall: shirts above, trousers and skirts below.
Building one yourself
A DIY clothing rack is where open storage gets interesting, because you can build to the exact centimetre of the space you have. Most homemade racks come down to the same thing: four uprights, a bar and a shelf, usually in cheap softwood and black plumbing pipe.
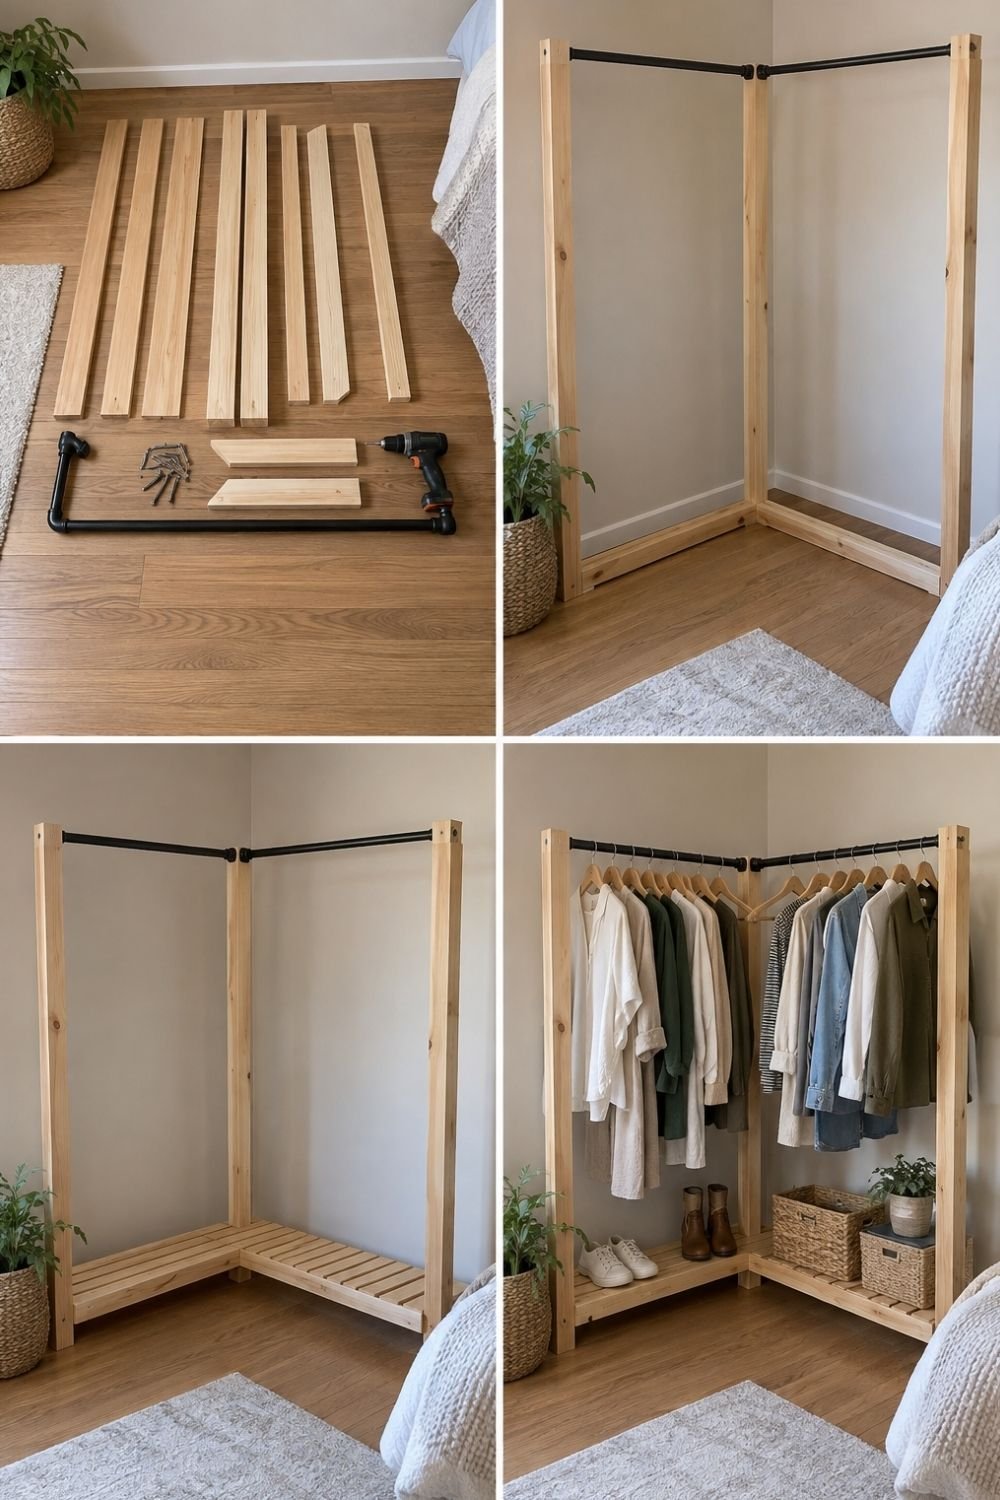
Photo by OurHoneyHome
The four frames above show a corner unit being built. It starts with the parts laid out on the floor: eight lengths of pine, two short cleats, a black pipe with elbow joints, a handful of screws and a drill. The second frame shows the frame standing in the corner, two uprights on each wall with the pipe running around the corner between them. In the third, a slatted shelf has been added across the base. In the last, the rack is full: white, olive, cream and denim pieces on matching wooden hangers, boots and sneakers on the shelf, two woven baskets and a small plant.
What makes this design work is the corner itself. A straight rack against a wall takes a chunk out of the room; wrapping it around a corner uses the part of the room that was doing nothing anyway, and the two runs of clothes brace each other so the whole thing feels solid. If you build one, keep the bar no longer than about 120 cm between supports, or it will bow within a month.
Secondhand pieces already shaped like a clothing rail
Some of the best clothing racks were never racks at all. An old wooden ladder, a pair of tripod poles, a length of scaffold board: these things already have the proportions, and they cost a fraction of a new unit.
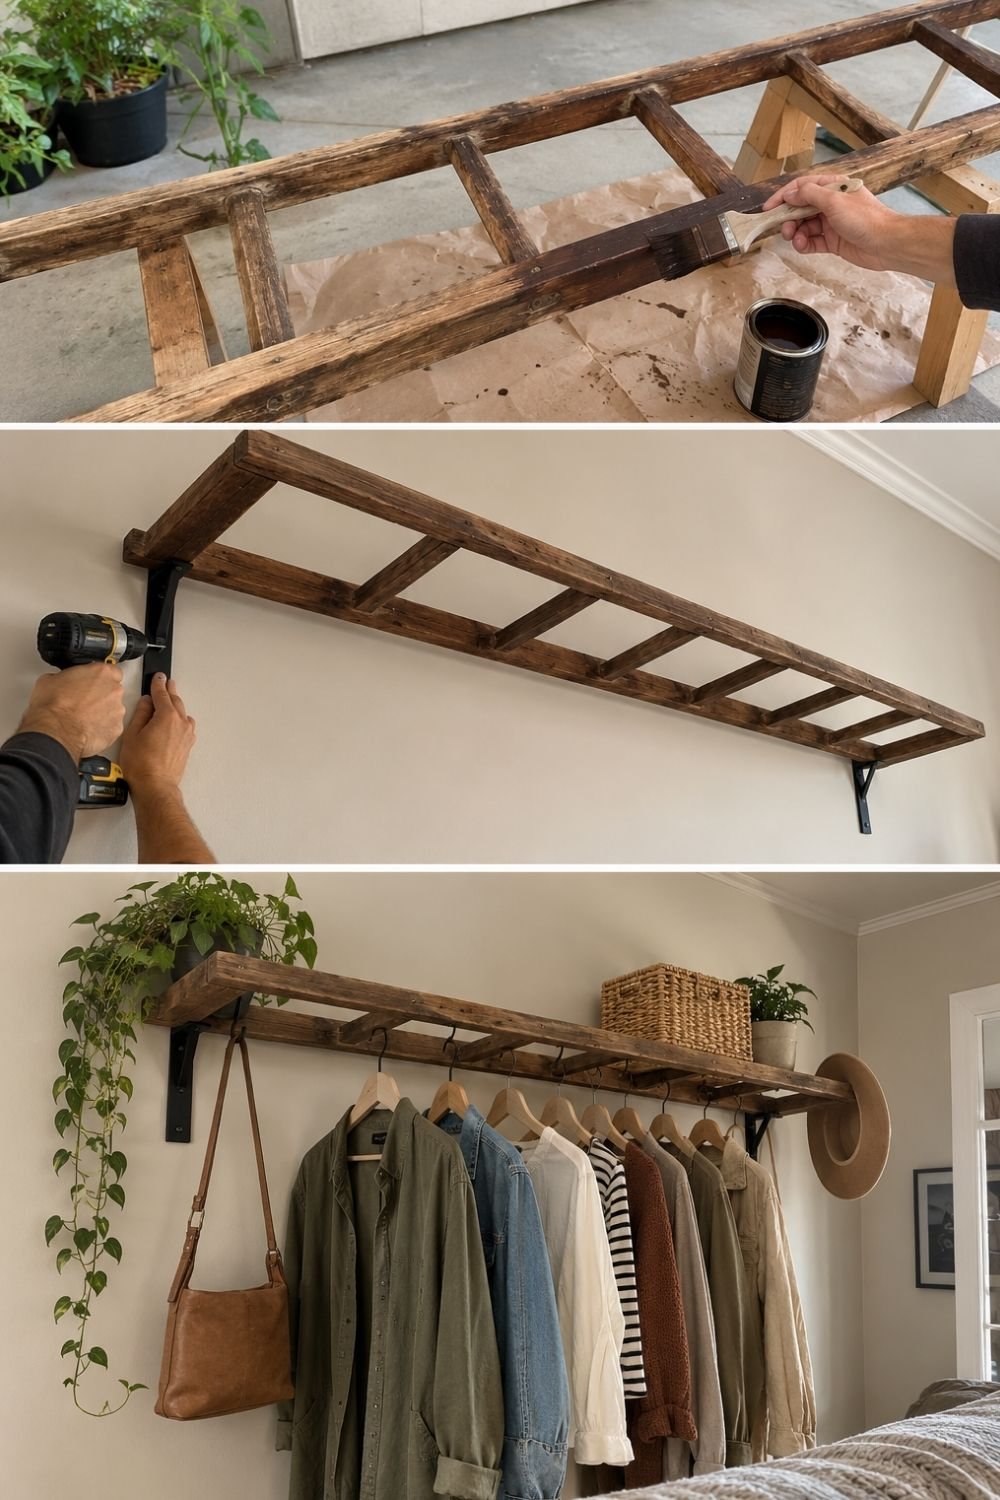
Photo by OurHoneyHome
The three frames above follow an old wooden ladder from junk to joinery. First it’s outside on a dust sheet, being brushed with dark wood stain. Then it’s held flat against the bedroom wall and screwed onto black metal brackets, rungs facing out. In the last frame it’s finished: shirts and jackets hang from S-hooks slipped over the lowest rung, a leather bag hangs off one bracket, a straw hat is hooked at the far end, and the top face of the ladder holds a basket, a pot of greenery and a trailing plant.
That’s a smart piece of reuse, because the rungs give you hooks wherever you want them and the flat top becomes a shelf. A ladder mounted this way also handles weight well, as long as the brackets are into something solid.
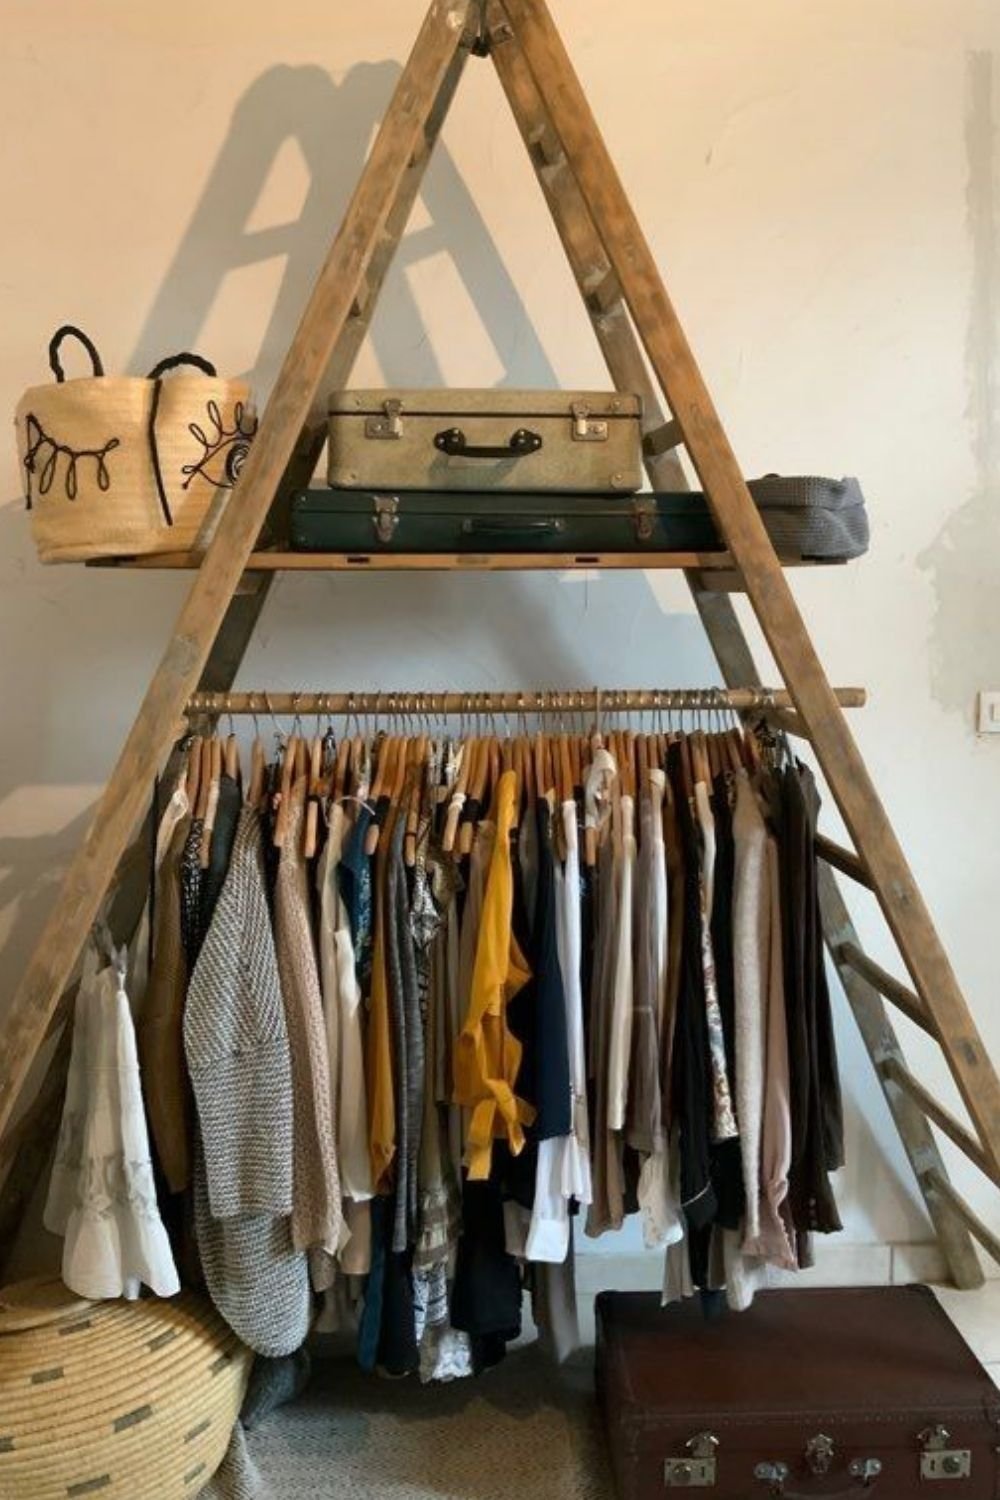
Photo by OurHoneyHome
A step ladder can stay a step ladder and still work, like the one above. Opened out into an A-frame against a wall, it holds a bamboo pole across the middle, packed with clothes on wooden hangers, while the top platform carries two vintage suitcases, a straw bag and a folded blanket. A big woven pouf and a leather suitcase sit on the floor beside it. It’s the kind of arrangement that looks like it happened by accident, though the clothes are all on identical hangers, which is what keeps it from tipping into chaos.
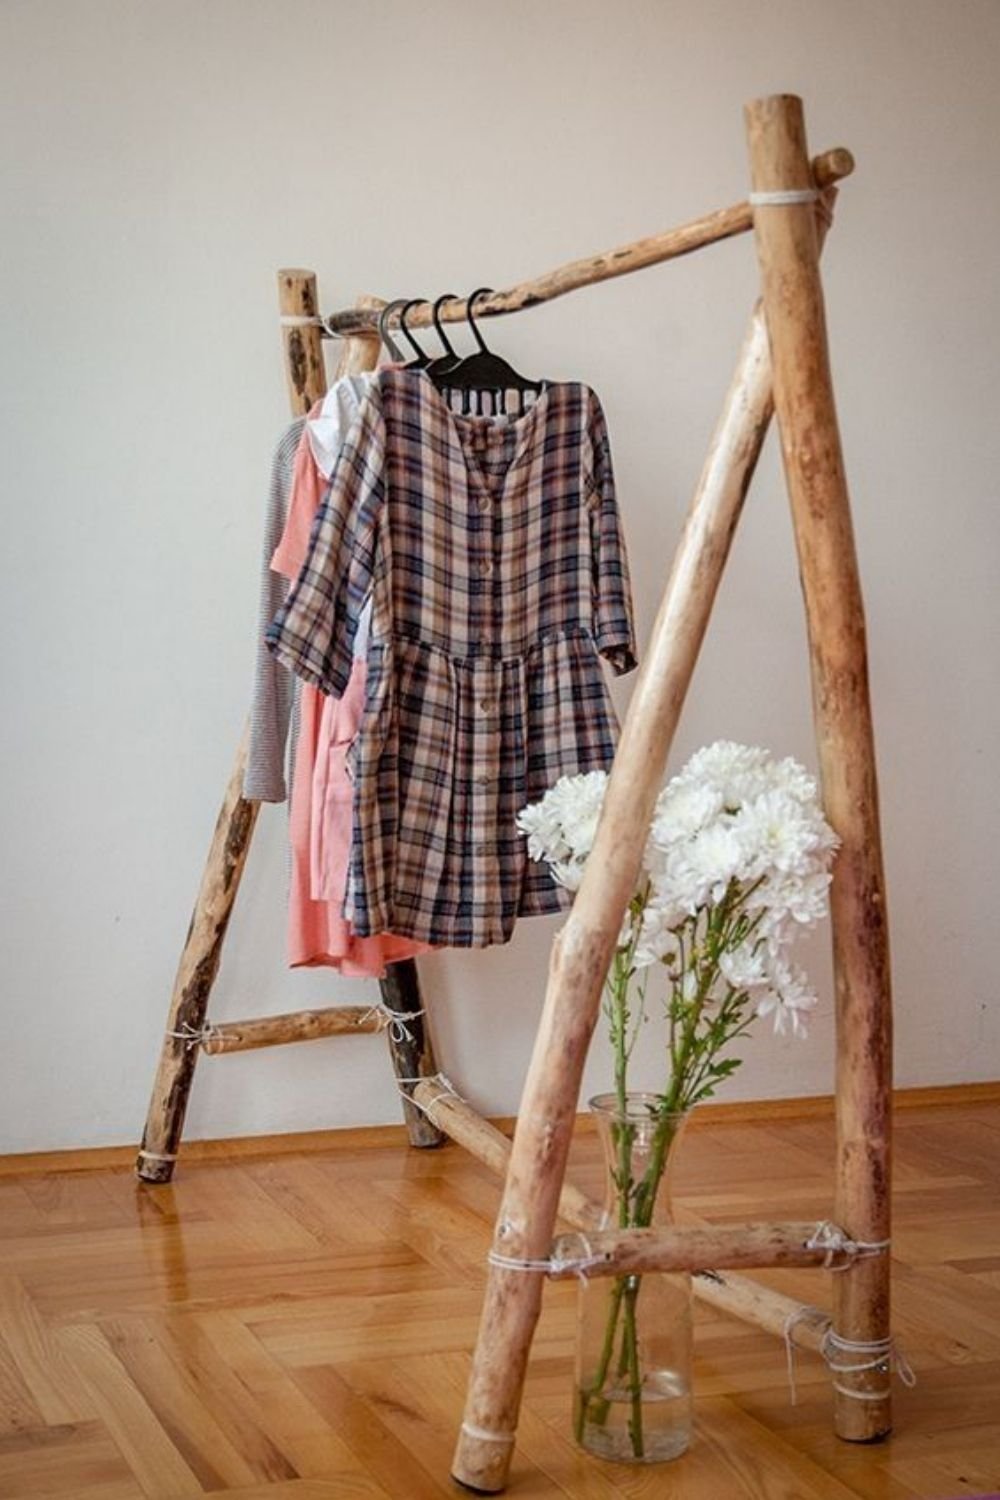
Photo by OurHoneyHome
And then there’s the branch tripod above, which is barely furniture at all: two pairs of peeled wooden poles lashed together with white cord, with a longer branch resting across them as a bar. It holds a handful of things, a checked dress, a coral cardigan, a striped top, with a jar of white chrysanthemums tucked underneath. This is a rack for someone who wants the object more than the storage, and that’s a perfectly good reason to build one. Just don’t expect it to hold a winter coat collection.
Keeping it from looking like a laundry pile
Everything above is the easy part. The harder part of an open wardrobe is that it stays visible, all the time, which means the standard for tidiness is higher than it is behind a door.
The single biggest change is matching hangers. Going from a mix of wire, plastic and velvet to one type of wooden hanger does more for the look than any amount of styling, because it lines up every shoulder at the same height and the same depth. Arranging by color helps too, and the easiest version is simply light to dark from left to right, which makes the rail read as one gradient instead of twenty separate items.
Then there’s the question of how much is on it. A rail that’s full to the ends always looks messy, whatever’s hanging there, so leaving five or ten centimetres of bare bar at each end is worth more than it sounds. If that means the off-season coats and the heavy knits move into boxes under the bed for six months, that’s a fair trade.
Below the rail, give shoes and bags a defined home rather than letting them settle on the floor: a bench, a shoe shelf, two baskets, a lidded box. And if the room ever needs the clothes to disappear, a curtain on a ceiling track in front of the rail turns the whole thing into a closet in one pull. The same logic that makes a gaming corner work in a small bedroom applies here: define the zone, then keep the floor around it clear.
If you’re renting
None of this needs to leave a mark. A freestanding clothing rack obviously doesn’t, and a tension rod fitted into an alcove or across a recess can carry a surprising amount of weight without a single screw, as long as the walls it presses against are solid and you don’t hang the winter coats on it. Over-door rails, garment racks on castors and a folding screen to hide them all fall into the same category.
If you do drill, keep the original fittings, patch the holes when you leave, and take the rack with you. A rail is one of the few upgrades that moves house as easily as the clothes on it, which is a useful advantage when you’re only somewhere for a year or two. There are more no-damage ideas in the uni room post, which deals with the same problem on a smaller scale and a tighter budget.
What an open rail is really telling you
The thing nobody mentions about open storage is that it’s honest. A closed wardrobe will take anything you push into it and keep the evidence to itself. A rail won’t. You see the shirt you haven’t worn in two years every single morning, and after a while you either wear it or let it go.
That’s why I’d start with the rack before the decluttering, not after. Put up the rack, hang what you actually reach for, and let the rest sit in a box for a season. If you don’t go looking for any of it, you’ve found your answer, and you’ll have a corner of the bedroom that looks like it was planned rather than survived. Anything left over can go in the boxes and baskets in the trinket storage post, which is a whole other conversation.
