Every summer ends the same way. You bring home a bunch of wildflowers from a walk, a few stems from the garden or a little bouquet from the market, put them in a jug on the table, and for a week they’re the best thing in the room. Then the petals drop, the water turns cloudy, and the whole thing goes in the bin. It always feels a bit sad, because a heavy book and two weeks of patience would have been enough to keep them for years.
That’s the quiet charm of pressed flower decor. It turns a passing season into something you can frame, hang in a window or wrap around a lamp, and it makes any corner feel cozy and personal without costing much at all. I think it’s one of the most rewarding small crafts there is, mainly because the hardest part is waiting.
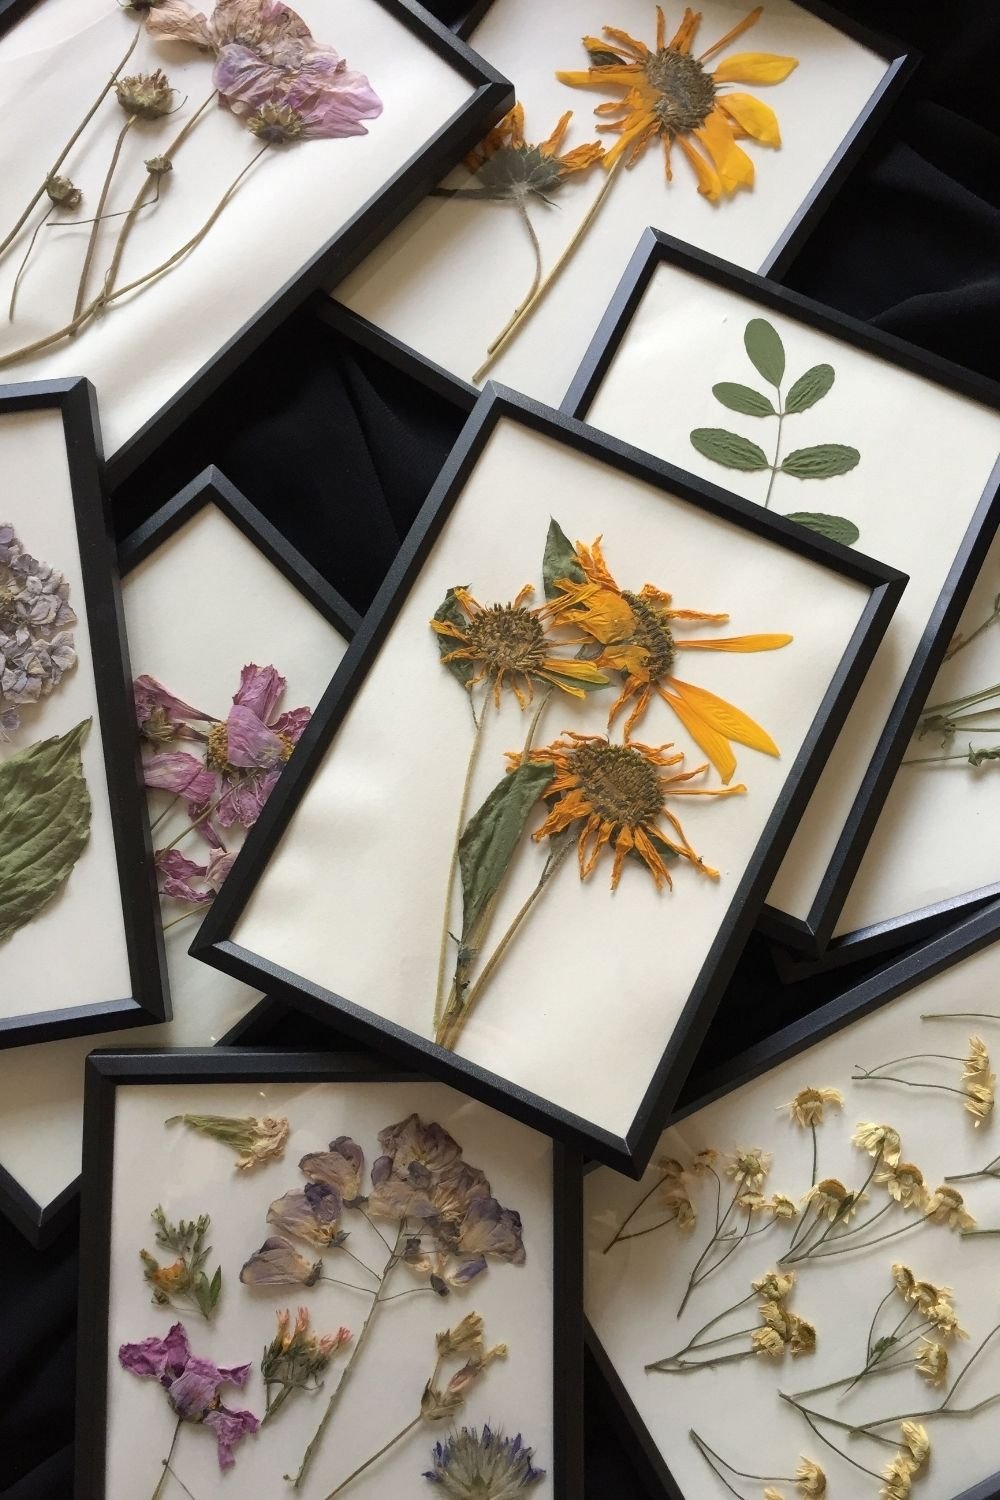
Photo by Rumeysa Demir on Pexels
The photo above shows what a single season of pressing can turn into: a pile of simple black frames, each holding one small arrangement on cream paper. There are orange daisy-like blooms with their leaves, pink cosmos, pale lilac hydrangea florets, a single green leaf stem, a scatter of tiny chamomile flowers and a loose mix of purple and pink petals. Hung together, they’d make a botanical gallery wall; on their own, each one works on a shelf or a bedside table.
Below, I’ll start with the basics (how to press and which flowers to pick), then go through six projects, from the easiest to the ones that take a bit more patience.
How to press flowers with the book method
There are faster ways to press flowers, but the book method is the one I’d start with. It’s free, it’s gentle, and it keeps colors surprisingly well.
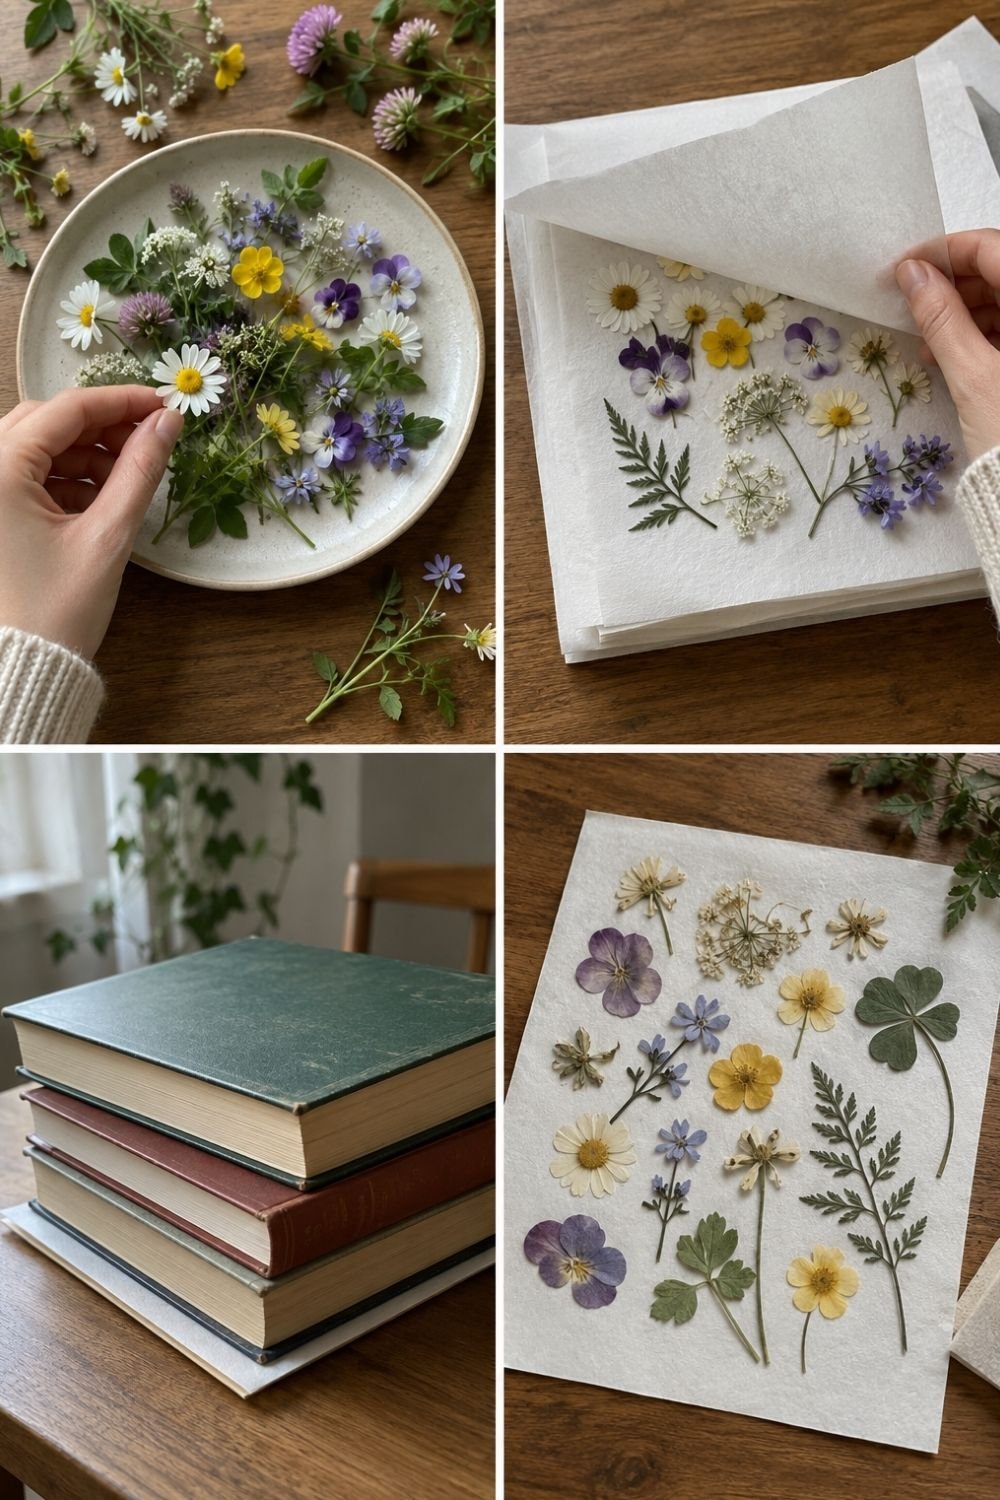
Photo by OurHoneyHome
The four frames above show the whole process. First, a plate of freshly picked flowers: daisies, violas, buttercups, clover, cornflowers and a few leaves. Then the flowers are laid flat on paper and covered with another sheet. In the third frame, the paper sits under a stack of heavy hardback books. In the last, the finished sheet shows every flower flat, dry and still full of color, from purple violas and yellow buttercups to ferns, a clover leaf and a head of cow parsley.
Step by step:
- Pick on a dry day, late morning after the dew has gone. Wet flowers go brown and moldy.
- Choose flowers at their best, just opened, not already fading.
- Lay them flat on absorbent paper (baking paper, blotting paper or plain printer paper) without overlapping. Face flat flowers like pansies down; press thicker flowers from the side.
- Cover with a second sheet and close them inside a heavy book, or stack several books on top.
- Leave them for 1–3 weeks. Change the paper after a few days if the flowers are fleshy.
- Store finished flowers between paper in a box or folder, away from light and humidity.
If you want results faster, a microwave flower press or a wooden press with screws works too. But for a first try, a stack of old books does the job.
Which flowers press best
This is where most first attempts go wrong. Not every flower wants to be flat.
Great for beginners:
- Pansies and violas (probably the easiest of all, and they keep their color)
- Daisies, chamomile and small asters
- Cosmos and larkspur petals
- Cow parsley, Queen Anne’s lace and yarrow
- Forget-me-nots and lobelia
- Ferns, clover, herb leaves and small autumn leaves
Harder to press:
- Roses, peonies and tulips are thick and full of water. Press single petals instead of the whole flower.
- Sunflowers and big daisies have a thick center that doesn’t flatten. Slice them in half or press just the petals.
- White flowers can turn cream or brown, which isn’t always bad but is worth knowing.
A useful rule: the flatter and thinner a flower is naturally, the better it presses.
Project 1 (Easy): Framed pressed flowers
Framed pressed flowers are the simplest way to start, and also the one that looks the most finished. Pressed flower wall art can be as small as a postcard or as large as a poster.
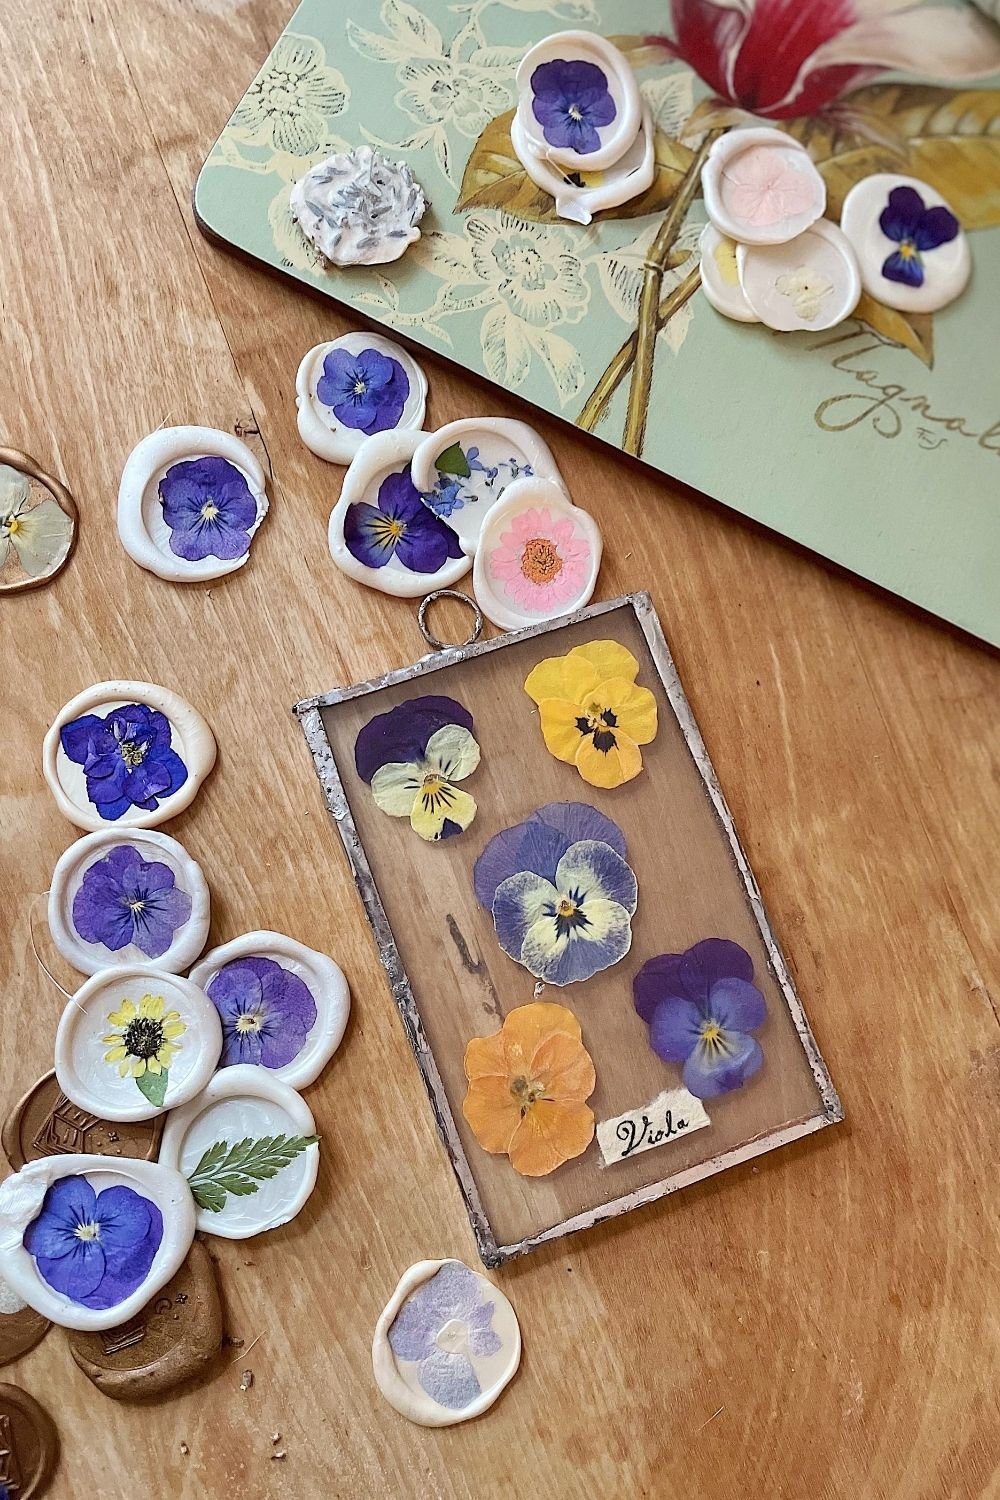
Photo by Merve Bayar on Pexels
Here five violas in purple, yellow and orange sit between two panes of glass in a small soldered metal frame with a hanging loop and a tiny handwritten “Viola” label. Around it, there are a dozen white wax seals, each with a single pressed viola, a sprig of fern or a little daisy set into it. The frame would look lovely in a window, and the seals could close letters or sit on gift tags.
What you need: a frame (a double-glass floating frame is the easiest), tweezers, a little clear-drying glue, and paper or card if you want a background.
How to do it:
- Floating frame: arrange the flowers directly on one pane of glass, lay the second pane on top, and close the frame. No glue needed, and light shines through.
- Classic frame: glue the flowers onto cream or watercolor paper with tiny dots of glue, then frame behind glass.
- Gallery wall: use several identical frames and vary what’s inside. Matching frames make mismatched flowers look like a collection.
Project 2 (Easy): Clear ornaments
Clear fillable ornaments are cheap, quick, and one of the prettiest things you can do with a handful of small pressed flowers.
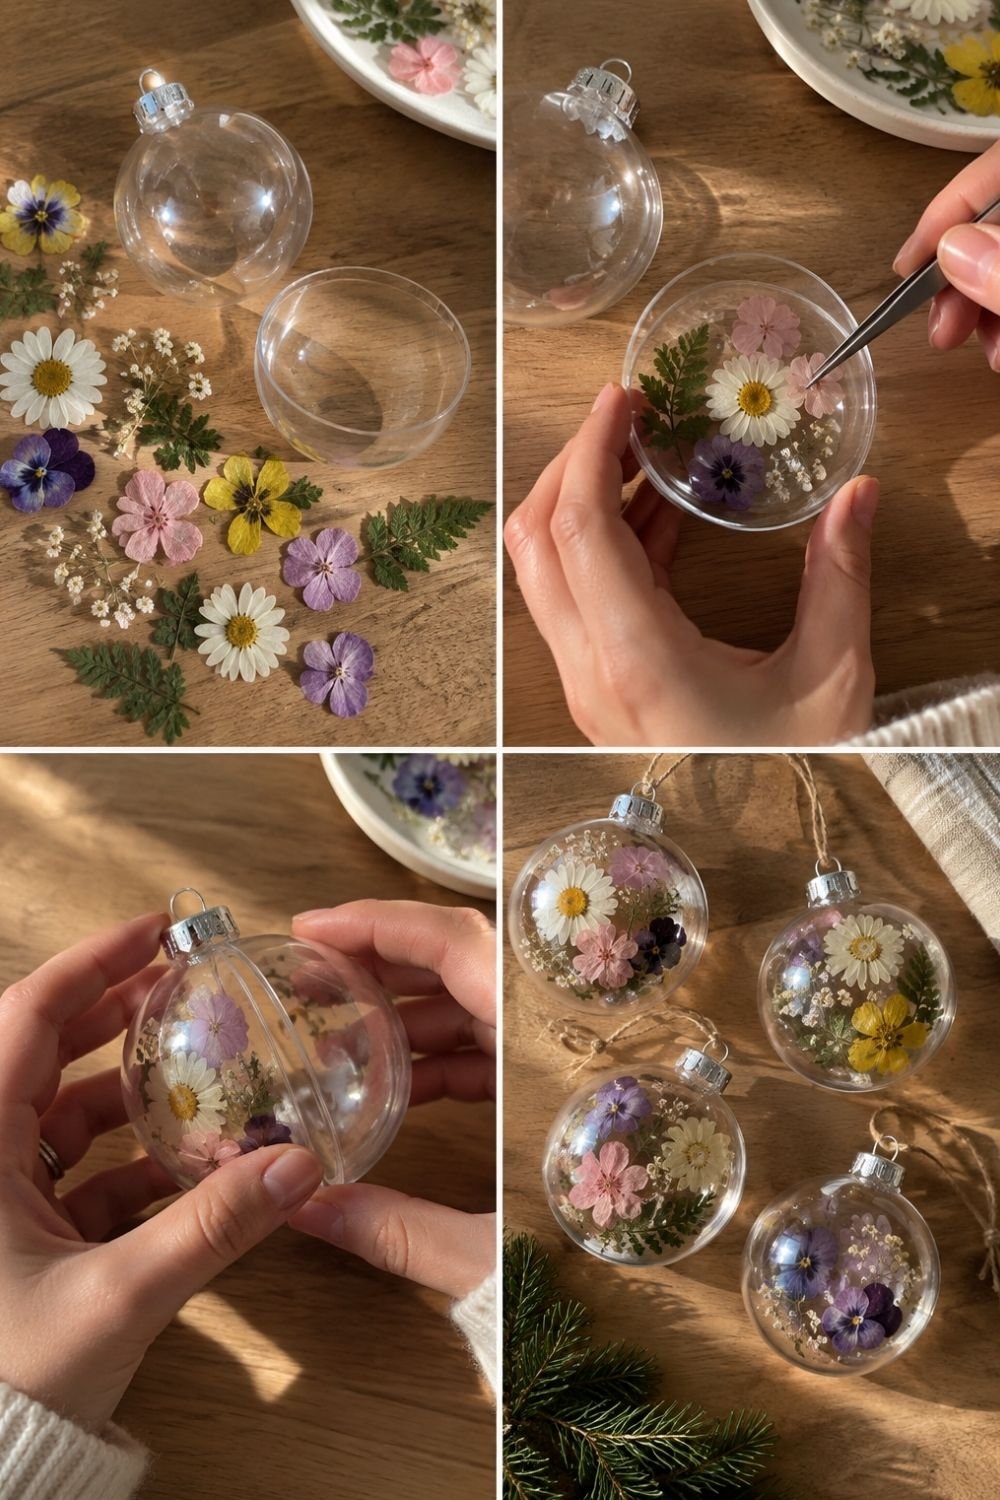
Photo by OurHoneyHome
The four frames above take a two-part clear ornament from empty to finished. First, the open halves lie on a wood table next to pressed daisies, violas, pink blossoms, buttercups, baby’s breath and ferns. Then tweezers place the flowers one by one inside one half, pressing them against the plastic. In the third frame, the two halves are clicked together. The last shows four finished ornaments, each with a slightly different mix, hung on twine next to a sprig of fir.
Tips:
- Place the prettiest flower face out against the plastic, then fill in around it with smaller pieces.
- A tiny dot of glue keeps flowers from sliding to the bottom.
- Don’t overfill. A bit of empty space lets light through.
They’re obvious as Christmas ornaments, but hung from a spring branch in a vase, they look just as good in April.
Project 3 (Medium): A suncatcher mobile
This one takes an afternoon, and it’s the project I’d pick for a sunny window.
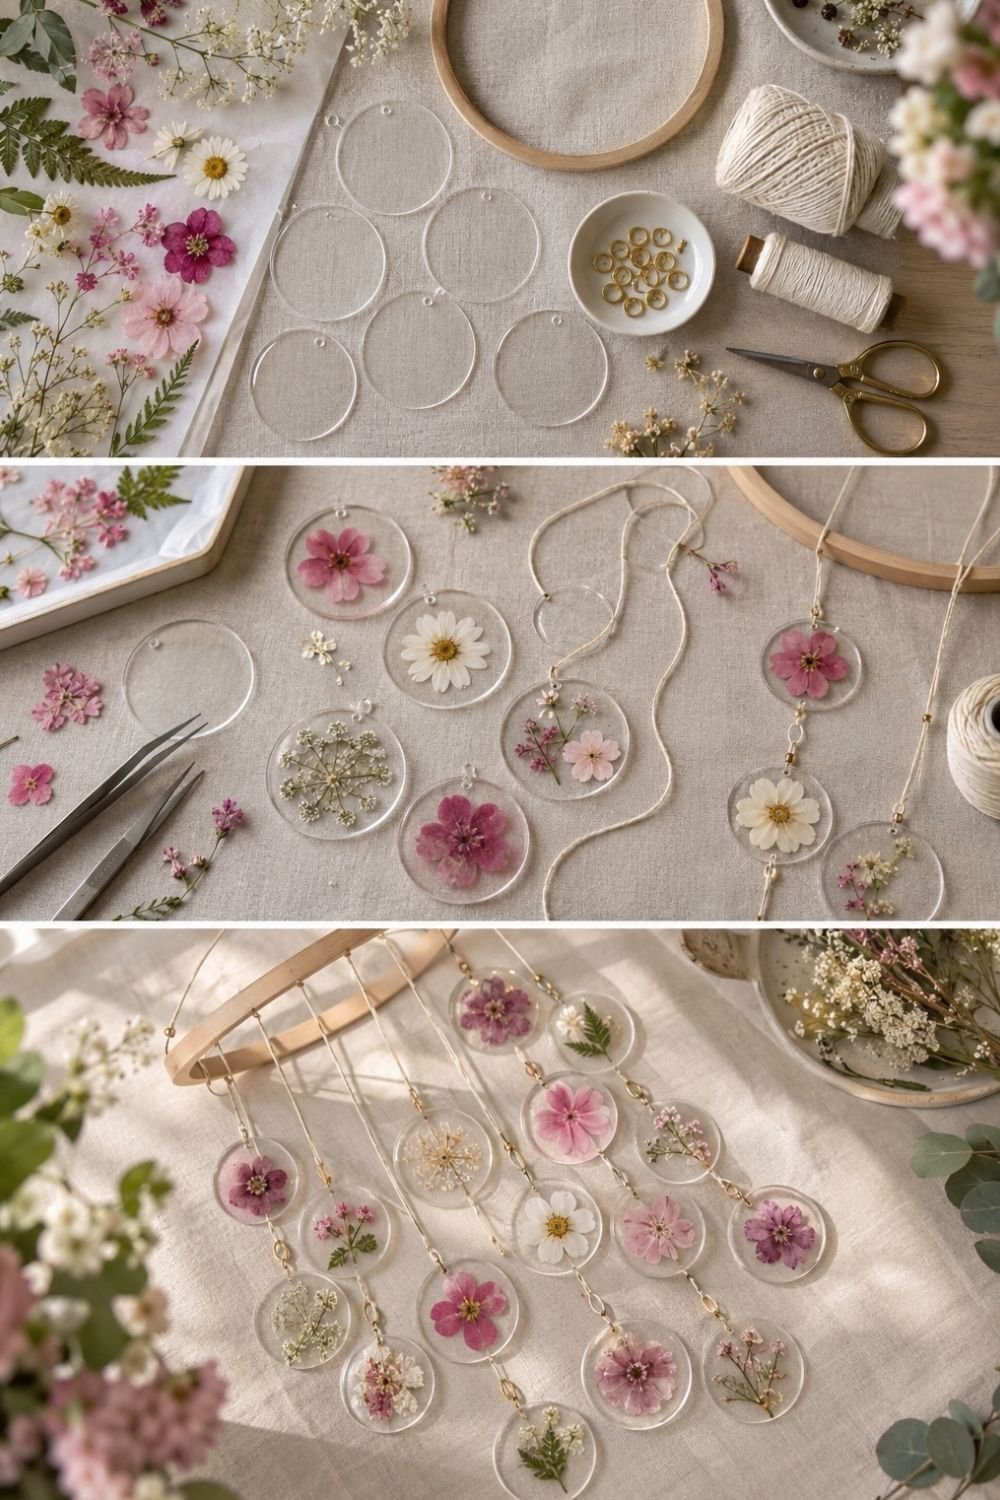
Photo by OurHoneyHome
The three frames above show the process. First, the materials: a tray of pressed pink flowers, daisies, baby’s breath and ferns, a stack of clear acrylic discs with a hole at the top, a wooden embroidery hoop, gold jump rings, cotton twine and scissors. In the middle frame, each disc gets a single flower sealed onto it, and the discs are linked into strands with twine and rings. The last frame shows the finished mobile: several strands of flower discs hanging from the hoop, in shades of pink, magenta and white with the odd fern leaf.
How to make it:
- Glue one flower to each disc with a thin layer of clear-drying glue or decoupage glue, then add a second disc or a coat of sealant on top.
- Link the discs into strands of three or four with jump rings.
- Tie the strands evenly around the embroidery hoop.
- Hang the hoop from three pieces of twine tied together at the top.
Keep the palette tight (here, pinks and whites) so the whole mobile reads as one piece.
Project 4 (Medium): Glowing jars
Old glass jars and a string of fairy lights turn into little lanterns with a layer of flowers on the outside.
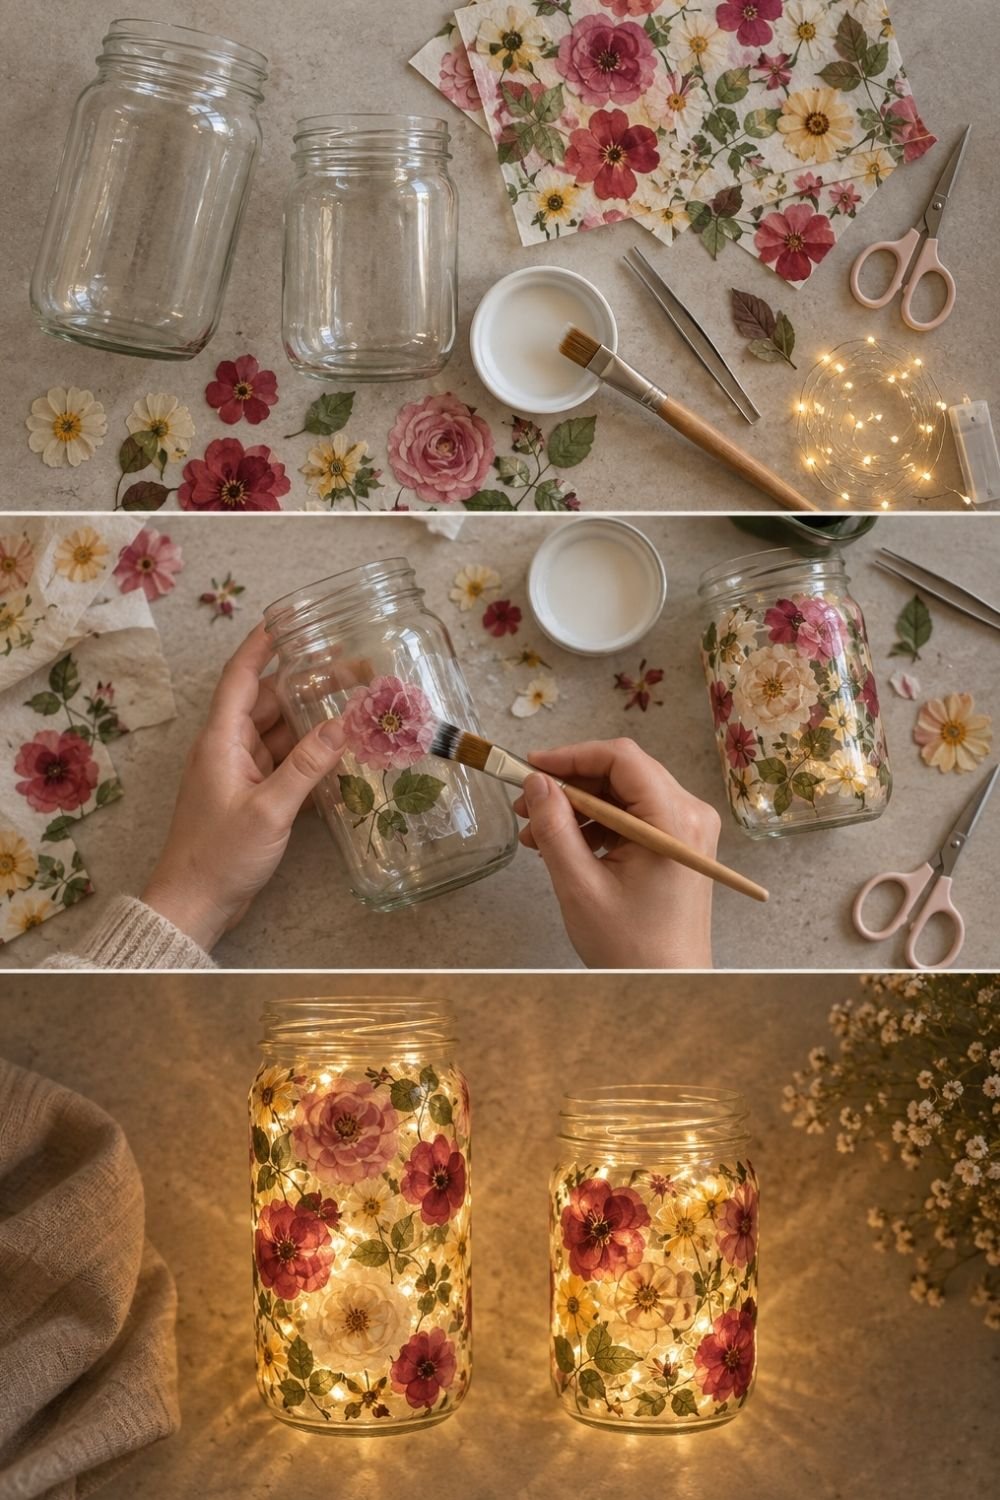
Photo by OurHoneyHome
The three frames above start with two clean jars, a pot of decoupage glue, a brush, tweezers, scissors, a battery fairy light, a few pressed flowers and sheets of floral-print tissue paper. In the middle frame, flowers and tissue cutouts are brushed onto the glass until one jar is fully covered. In the last, both jars glow with fairy lights inside, the red, pink and cream flowers lit from behind like stained glass.
The trick here is mixing pressed flowers with floral tissue paper or napkin cutouts. Pressed flowers give texture, and the tissue fills the gaps quickly, so you don’t need dozens of flawless blooms. Brush a thin layer of decoupage glue onto the glass, lay the pieces on, and brush another layer over the top. Use battery fairy lights, never candles, since the paper and dried flowers are flammable.
Project 5 (Bit more patience): A pressed flower lampshade
A lampshade is where pressed flowers look their most magical, because the light shines through the petals.
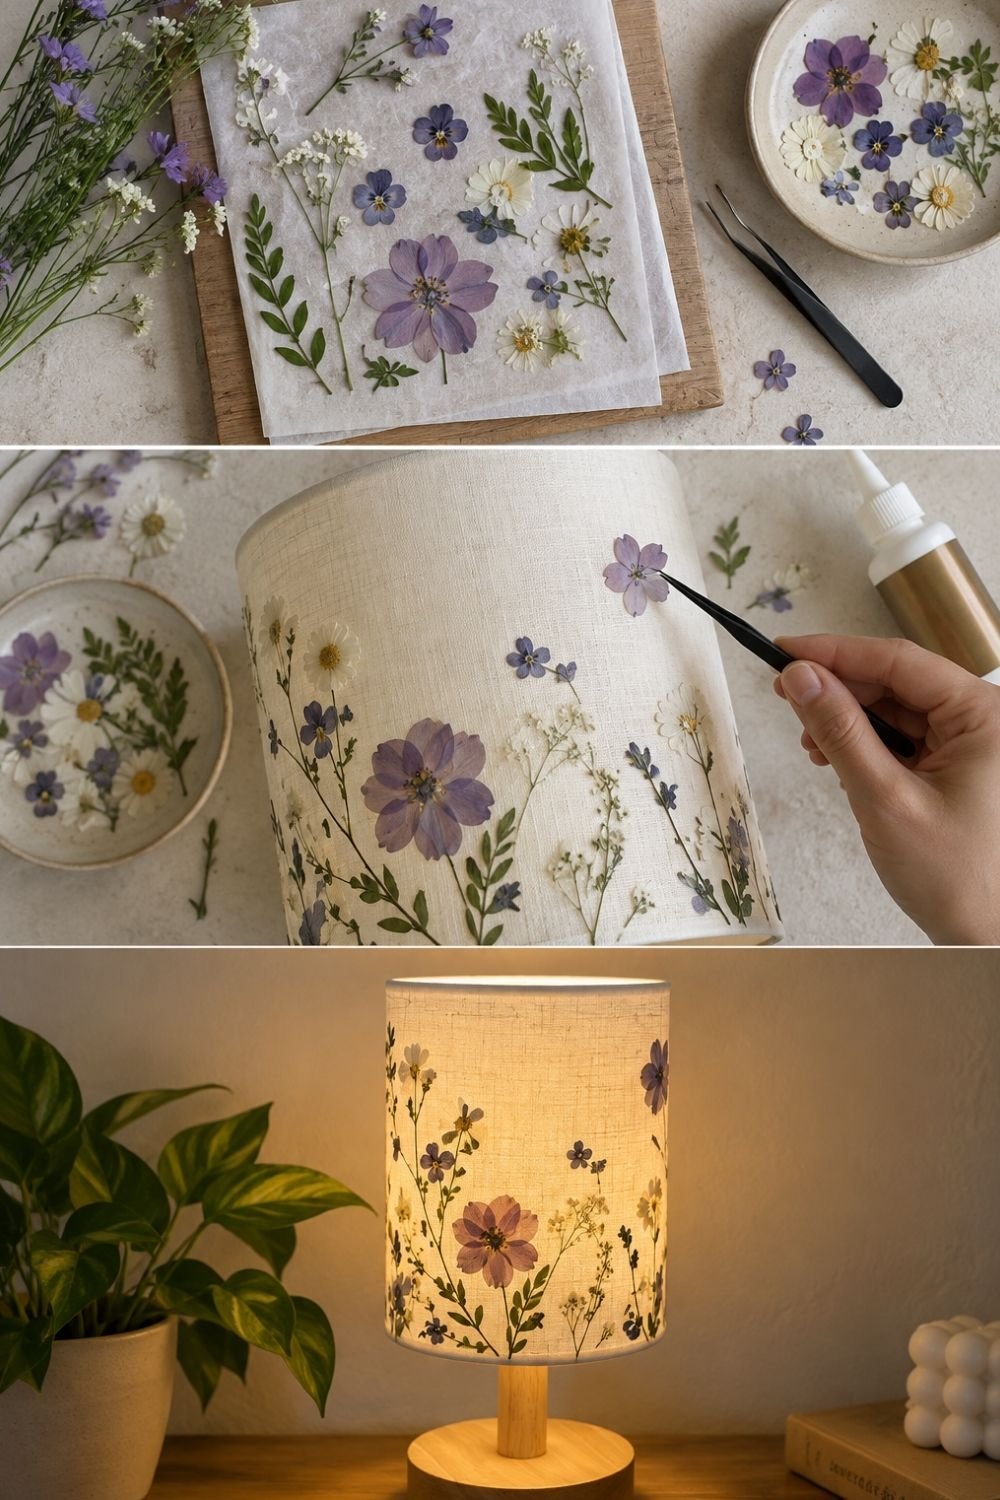
Photo by OurHoneyHome
The three frames above show the process on a plain linen drum shade. First, the flowers are laid out on paper to plan the design: purple cosmos, violas, white daisies, sprigs of baby’s breath and slim leaves. Then they’re glued onto the shade one by one with tweezers, mostly along the bottom edge like a meadow. In the last frame, the lamp is switched on, and every stem and petal shows through the linen, next to a pothos plant and a stack of books.
What matters:
- Use a plain fabric or paper shade in a light color. Dark shades won’t let light through.
- Glue thinly. Too much glue shows as shiny patches when the lamp is on.
- Plan the design on paper first, then transfer it piece by piece.
- Use an LED bulb only. It stays cool, which protects both the flowers and the shade.
Project 6 (Bit more patience): A flower-framed mirror
This is the most time-consuming project here, but it makes a statement piece for a bedroom, hallway or bathroom (away from the shower steam).
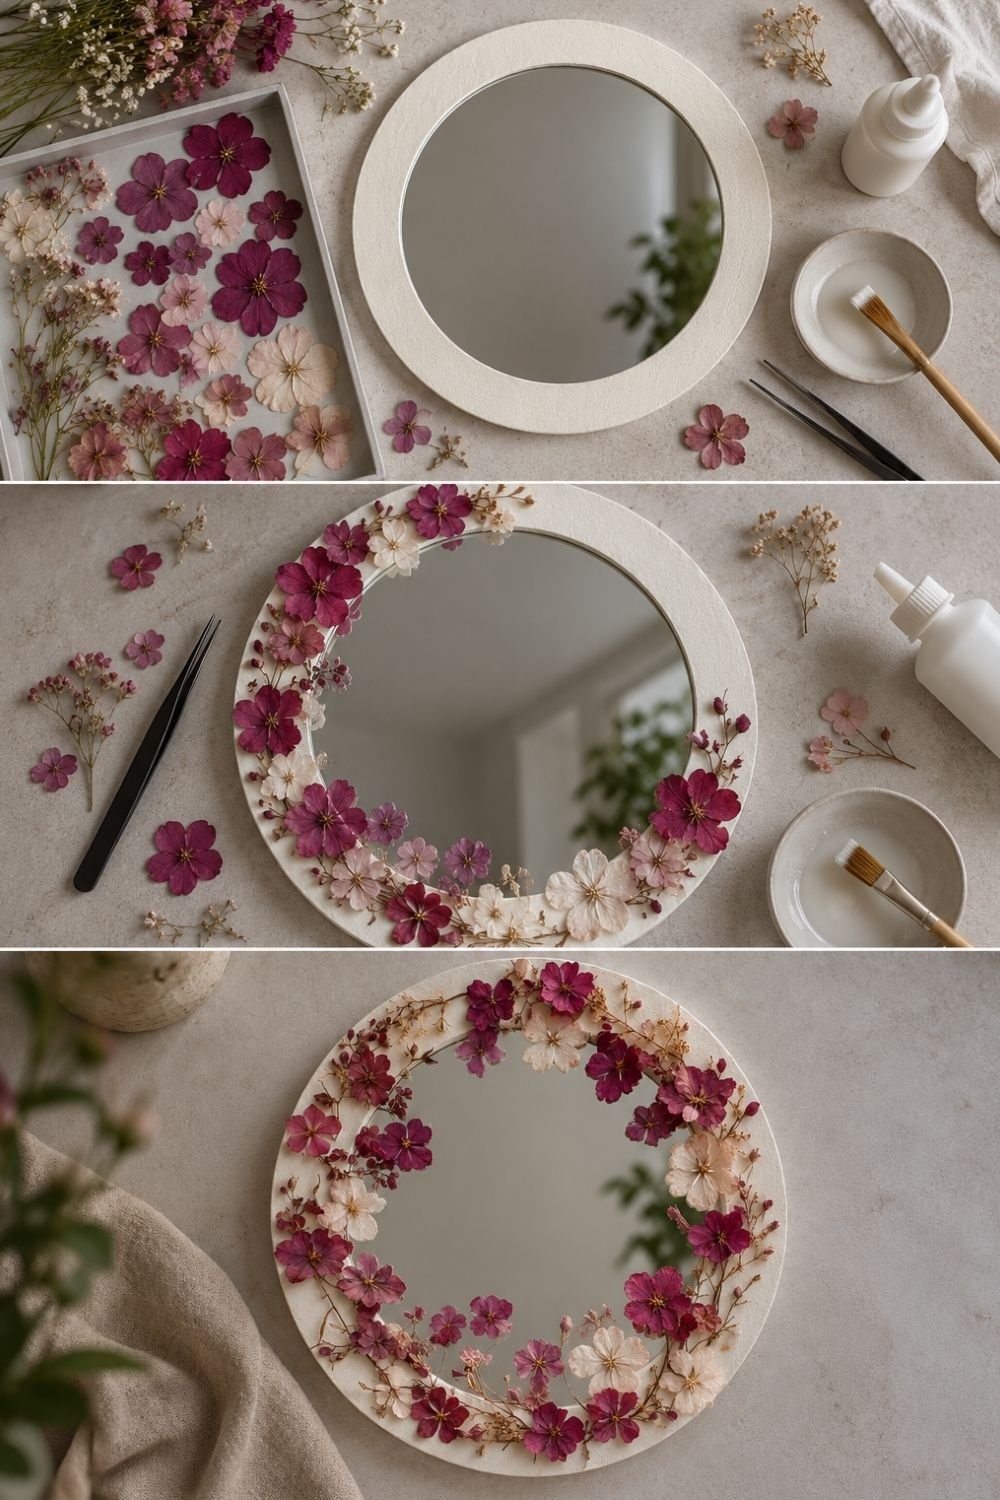
Photo by OurHoneyHome
The three frames above start with a round mirror in a wide, textured cream frame, a tray of pressed magenta, pink and blush flowers, sprigs of wax flower, glue, a brush and tweezers. In the middle frame, flowers are glued around the inner edge of the frame, starting on one side. The finished mirror has a full wreath of flowers in deep pink, soft pink and cream, with tiny sprigs tucked between the blooms, like a flower crown around the glass.
For a design like this, start with the largest flowers, spaced out around the ring, then fill the gaps with medium flowers, and finish with the tiny sprigs. Seal the whole frame with a matte decoupage glue or spray sealant when it’s done so the petals don’t lift.
Composition and color: a few rules
A few rules that make almost any arrangement look better:
- Less is more. One well-placed viola usually beats a crowded collage. White space around the flowers is part of the design.
- Odd numbers. Three or five flowers look more natural than two or four.
- One main color, plus one accent. Purple and yellow, pink and white, orange and green.
- Leaves are the filler. Ferns, clover and herb leaves connect the flowers and fill gaps.
- Vary the sizes. One large bloom, a few medium ones, and tiny sprigs to finish.
Styling by look
Pressed and dried flowers suit more styles than you might expect:
- Cottagecore: wildflowers in simple wood frames, a flower lampshade, a jar of pressed violas on the windowsill. The grandmacore kitchen post has lots of ideas that sit well next to this.
- Romantic: pinks, magentas and blush tones, gold frames, the flower mirror. It fits the soft, dreamy looks in the bedroom styles post.
- Vintage: soldered glass frames, old botanical labels, faded colors, wax seals.
- Minimalist: one flower per frame in a row of matching thin black frames, lots of cream paper around each one.
- Seasonal: spring blossoms and violas, summer wildflowers, autumn leaves and ferns, and winter ornaments with a sprig of evergreen.
If you like bringing plants inside as decor, the propagation station post is a nice living counterpart to these.
Keeping them from fading
Pressed flowers fade over time, especially in sunlight. A few things slow it down:
- Keep framed pieces out of direct sun, or use UV-filtering glass.
- Avoid damp rooms for anything not fully sealed, since humidity makes petals curl and spot.
- Seal open pieces (ornaments, jars, mirror frames) with a matte sealant.
- Accept a little fading. Softened, slightly faded colors are part of the vintage charm, and it’s easy to press a new batch next season.
Where I’d start this weekend
If you want to try this but don’t know where to begin, this is what I’d do. Go out this weekend and pick a small handful of pansies, violas, daisies and a few fern leaves. Press them in the heaviest book you own. Two weeks later, buy one double-glass floating frame and arrange three or four of the best flowers inside it. That’s it: one afternoon, one frame, and a little piece of this year’s garden on your wall. Once you’ve done that, the ornaments, the mobile and the lampshade will feel like the obvious next step.
