Most store-bought Halloween decor ends up in a box in the garage, slightly squashed, with a price tag nobody wants to remember. The DIY Halloween decorations below cost a few dollars each, take an afternoon at most, and fold flat for next year. They’re made from black card stock, twine, cheesecloth, yarn and a couple of thrift store finds, and every one of them has a photo for each step.
Start with the supply list, pick two or three projects, and finish with the porch.
What you’ll need for most of these
You probably have half of this already:
- Black card stock (heavier than printer paper, so shapes don’t curl) and one sheet of orange card stock
- Scissors and a craft knife with a metal ruler for the paper houses
- Jute twine or kitchen string
- A hole punch
- Cheesecloth and a few foam balls
- Black yarn and a wooden embroidery hoop
- White glue or a glue stick
- Removable mounting putty
- Black chalk-finish or acrylic paint and an old brush
- Battery-operated LED tealights
A pencil and a printed template or two make the cutting faster, but freehand shapes look just as good. Bats and pumpkins are supposed to be a little uneven.
A flock of paper bats on the wall
This is the fastest way to make a room look like Halloween, and it’s the one guests always notice first.
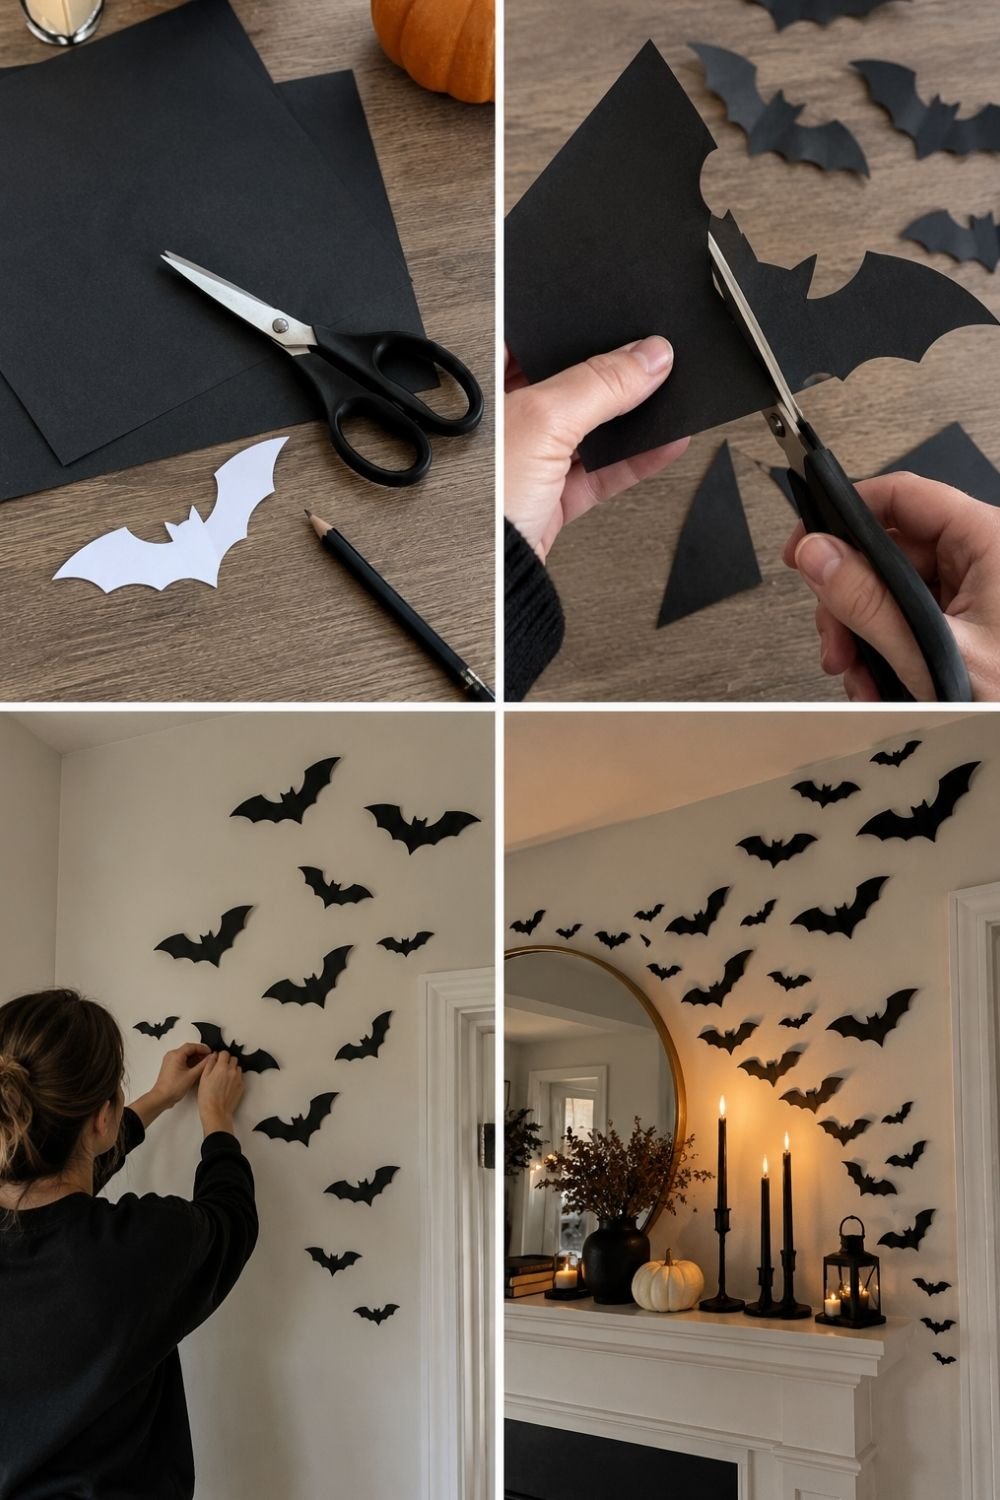
Photo by OurHoneyHome
- Make a template. Draw or print one bat shape on white paper and cut it out. Two or three sizes (roughly 4, 6 and 9 inches across) look more natural than one.
- Trace and cut. Trace the template onto black card stock and cut out as many bats as you have patience for. Twenty to forty covers a good stretch of wall.
- Fold the wings. A light fold down the middle of each bat lifts the wings off the wall and gives them a shadow.
- Stick them up in a swarm. Use small balls of removable putty on the body only. Start with a few big bats in one corner and let them get smaller and farther apart as they spread across the wall.
In the finished photo, the bats fly up from a white mantel with black taper candles, a white pumpkin, dried branches and a lantern, then spread around a round brass mirror. The mantel decor stays simple because the wall does the work.
Mounting putty is generally gentle on painted walls, but test one piece on a hidden spot first, especially on fresh or flat paint.
A bat garland on twine
The same bats, strung together, make a garland for a mantel, a doorway, a staircase or the back of a bookshelf.
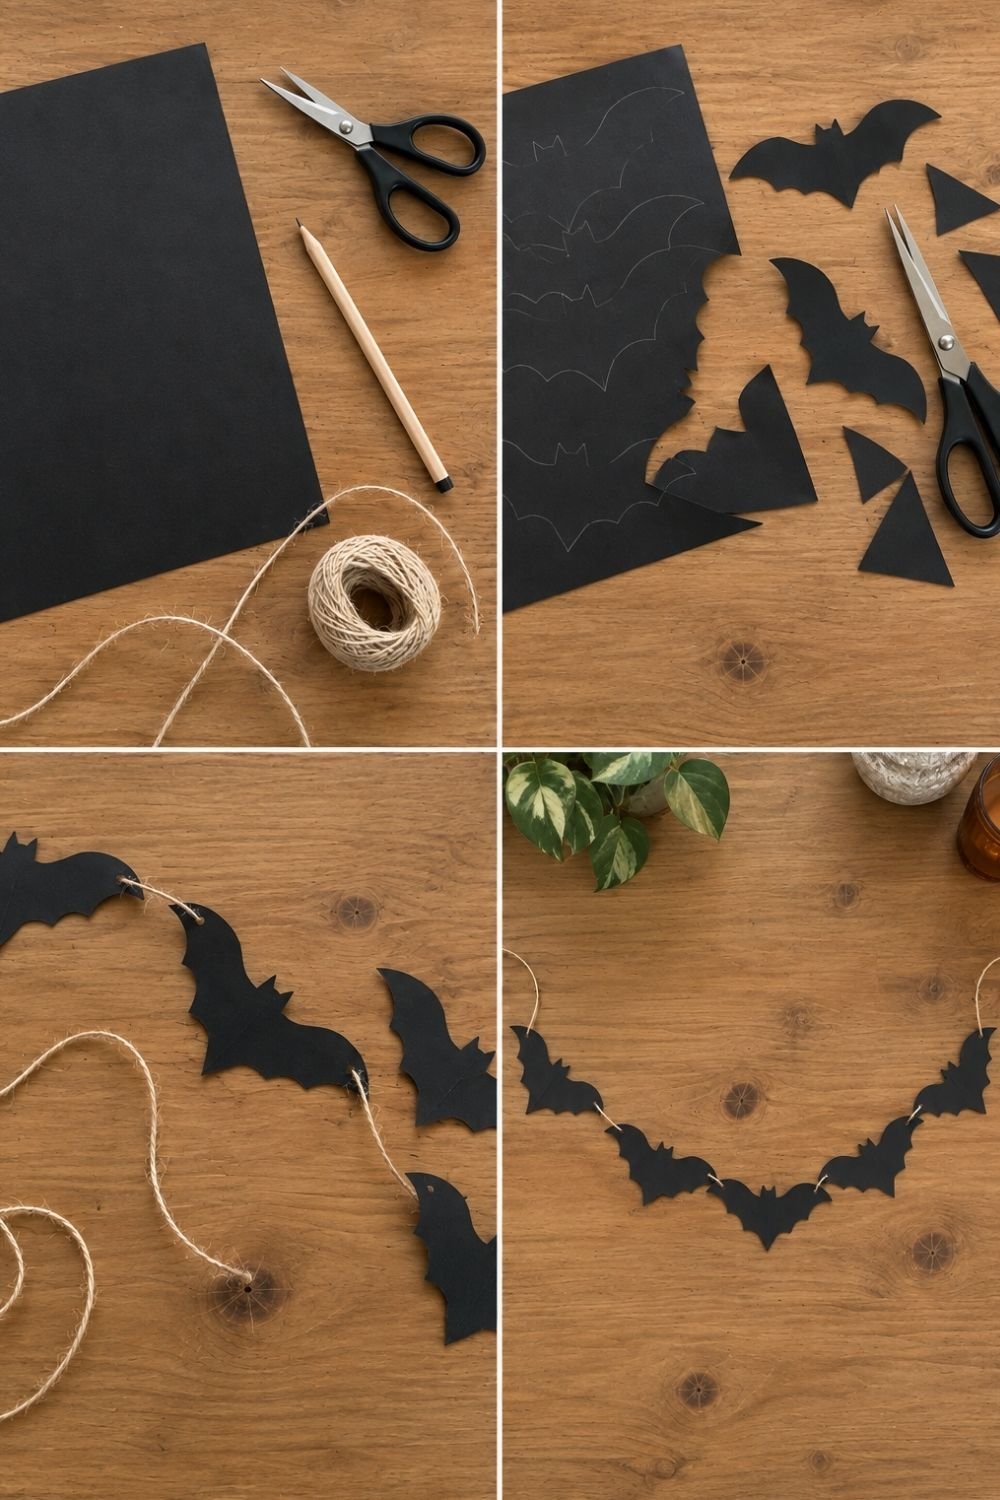
Photo by OurHoneyHome
- Trace a row of bats on black card stock, all about the same size.
- Cut them out.
- Punch a small hole near the tip of each wing.
- Thread jute twine through the holes, wing to wing, so the bats hang in a gentle curve. Leave a long tail of twine at each end for hanging.
Jute twine gives the garland a slightly rustic, homemade look. For a sharper, more gothic version, use black thread or thin black ribbon instead.
A pumpkin garland for the cute side of Halloween
Not every room needs to be spooky. A paper pumpkin garland works in a kitchen, a kids’ room or a front window, and it stays up happily into November.
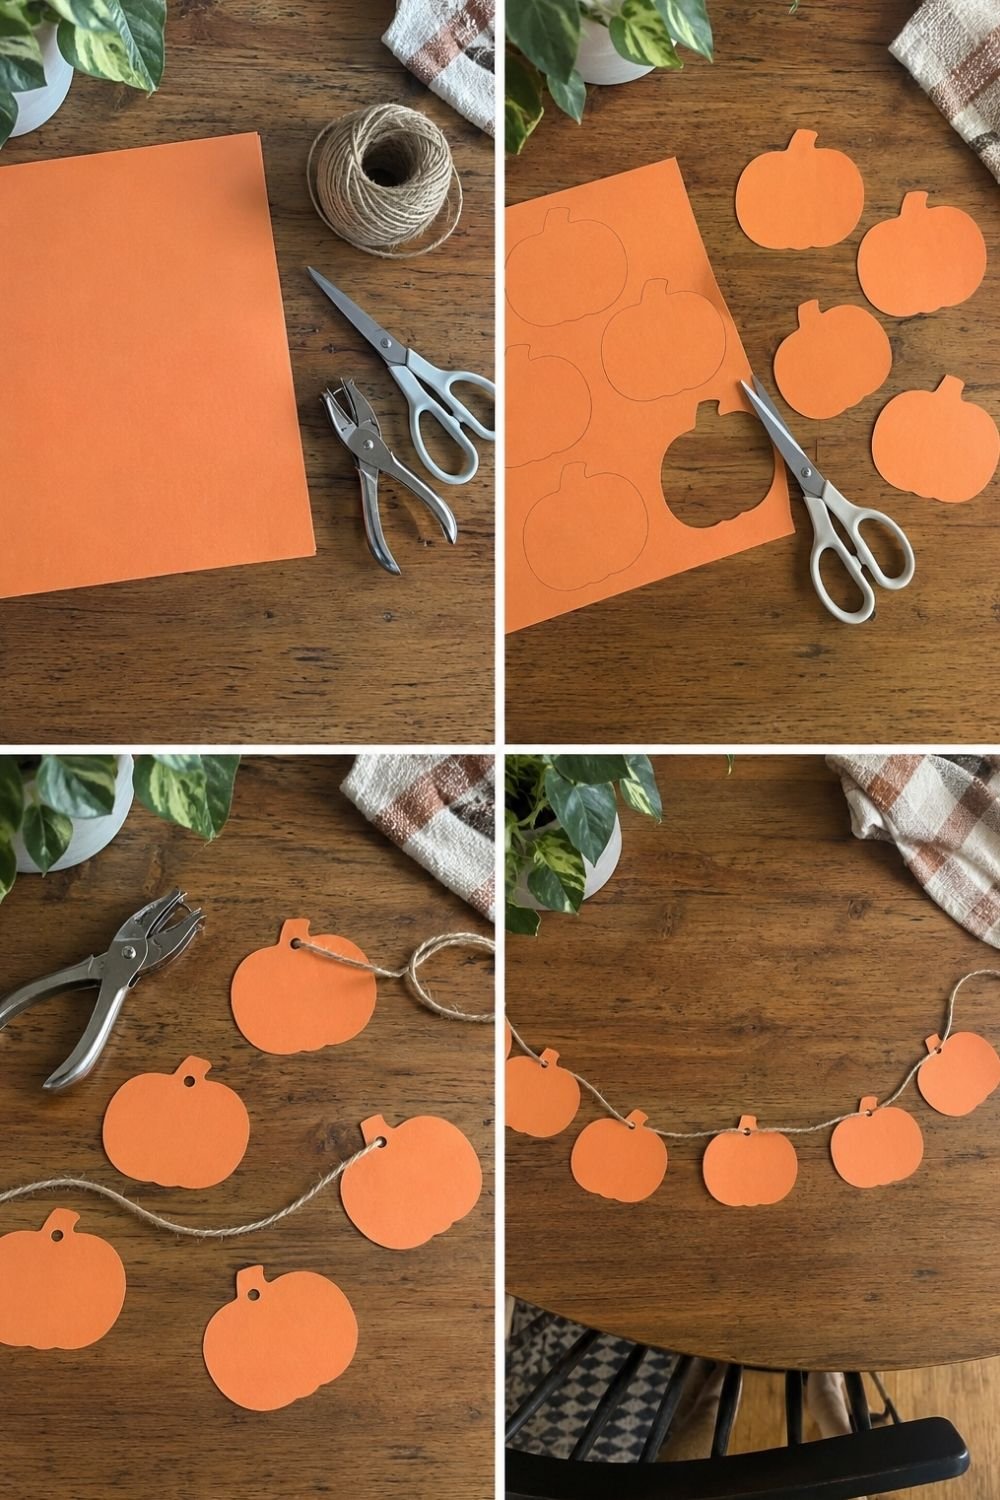
Photo by OurHoneyHome
- Draw simple pumpkin shapes, each with a small square stem, on orange card stock.
- Cut them out.
- Punch one hole in each stem.
- String them on jute twine, spacing them a few inches apart.
This is a good one to make with kids: the shapes are simple enough for safety scissors, and nobody minds a lopsided pumpkin. Once Halloween is over, the same garland moves straight into the fall decorating ideas for the rest of the season.
Cheesecloth ghosts for the porch
These floaty little ghosts are the project people will ask about (“you made those?”), and they take about ten minutes each.
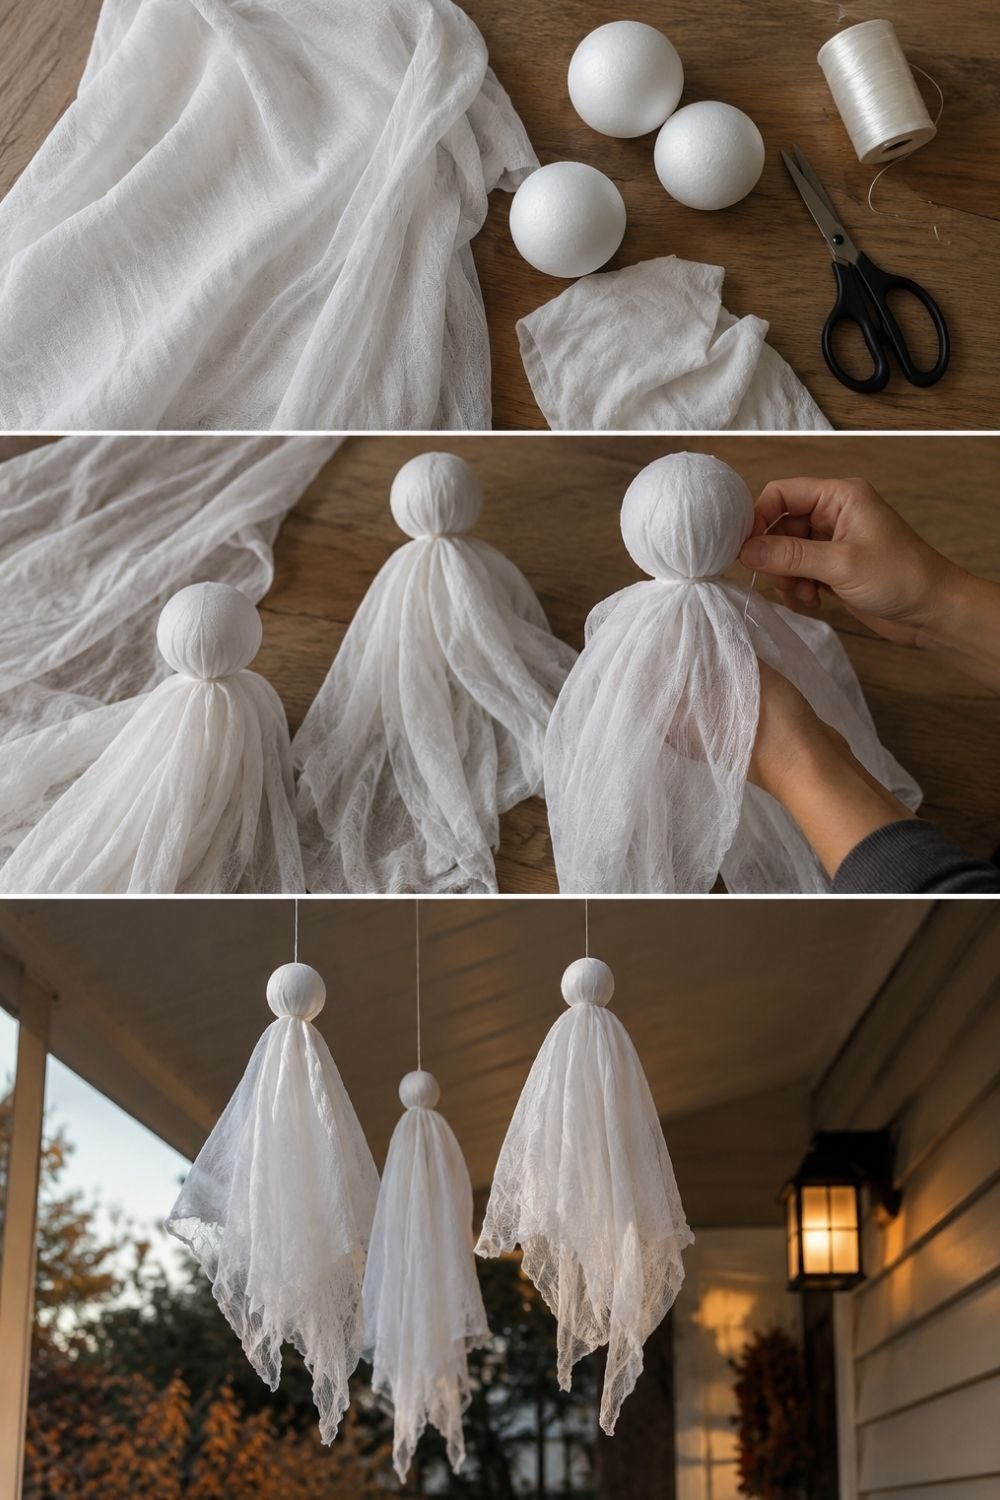
Photo by OurHoneyHome
- Cut the cheesecloth into squares about 2 to 3 feet wide, two layers per ghost.
- Cover a foam ball. Drape the cheesecloth over the ball so it hangs evenly on all sides.
- Tie the neck. Wrap white thread tightly just under the ball and knot it. Tug the fabric below into loose folds.
- Hang them. Thread a length of fishing line or white thread through the top of the head and hang the ghosts at different heights from a porch ceiling, a tree branch or a curtain rod.
In the last frame, three ghosts hang from the ceiling of a covered porch next to a lit lantern, and in the evening the cheesecloth glows slightly in the light.
Hang them where people won’t walk into them, and keep them well away from candles and hot bulbs, because cheesecloth catches fire easily. Under a covered porch they’ll last the whole season; in open rain they turn limp and gray, so bring them in on wet nights.
A yarn spider web in an embroidery hoop
This one looks like a dreamcatcher gone wrong, which is exactly the point. It hangs on a front door, above a mantel or on a bare wall.
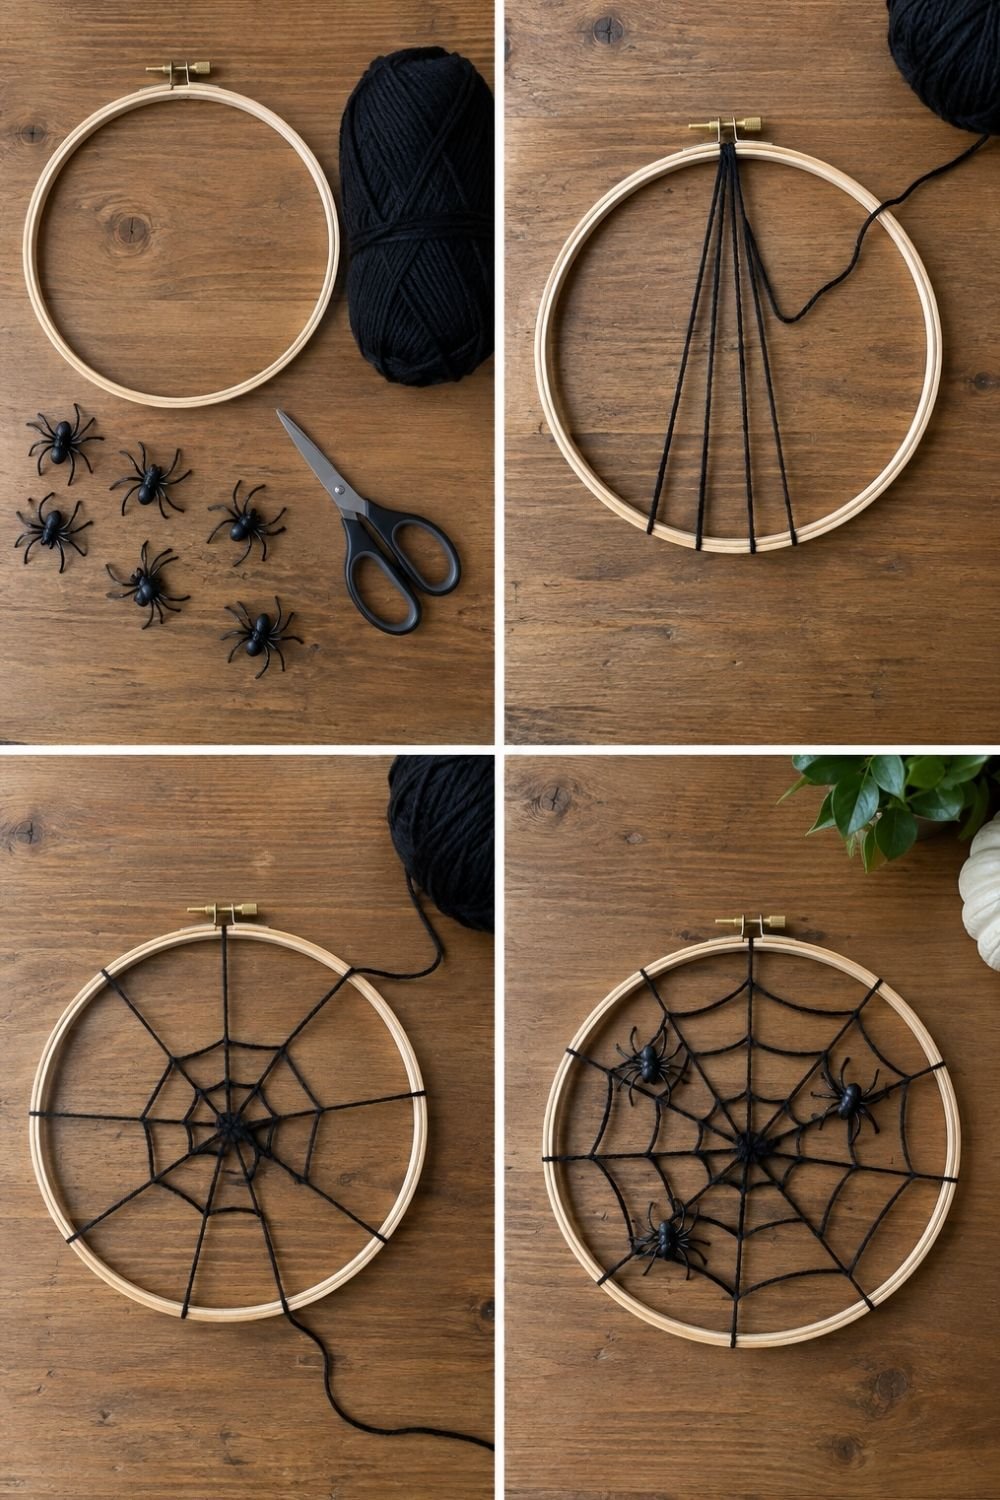
Photo by OurHoneyHome
- Make the spokes. Tie black yarn to the hoop at the top, pull it straight across to the opposite side and wrap it once around the hoop. Repeat until you have eight or so spokes crossing in the middle, like slices of a pie.
- Tie the center. Wrap the yarn a few times around the point where the spokes cross, so it doesn’t slip.
- Spiral outward. Starting near the center, loop the yarn once around each spoke as you go, working in a spiral toward the hoop. Keep the gaps between rounds roughly even.
- Add spiders. Glue or tie on a few plastic spiders, and hang the hoop from its brass screw with a loop of yarn.
A 10- or 12-inch hoop is a good size for a door. Two or three hoops in different sizes grouped together on a wall look even better than one.
A glowing paper village
Little black paper houses with lit windows are the most atmospheric project here, and they work on a mantel, a sideboard or down the middle of the dining table.
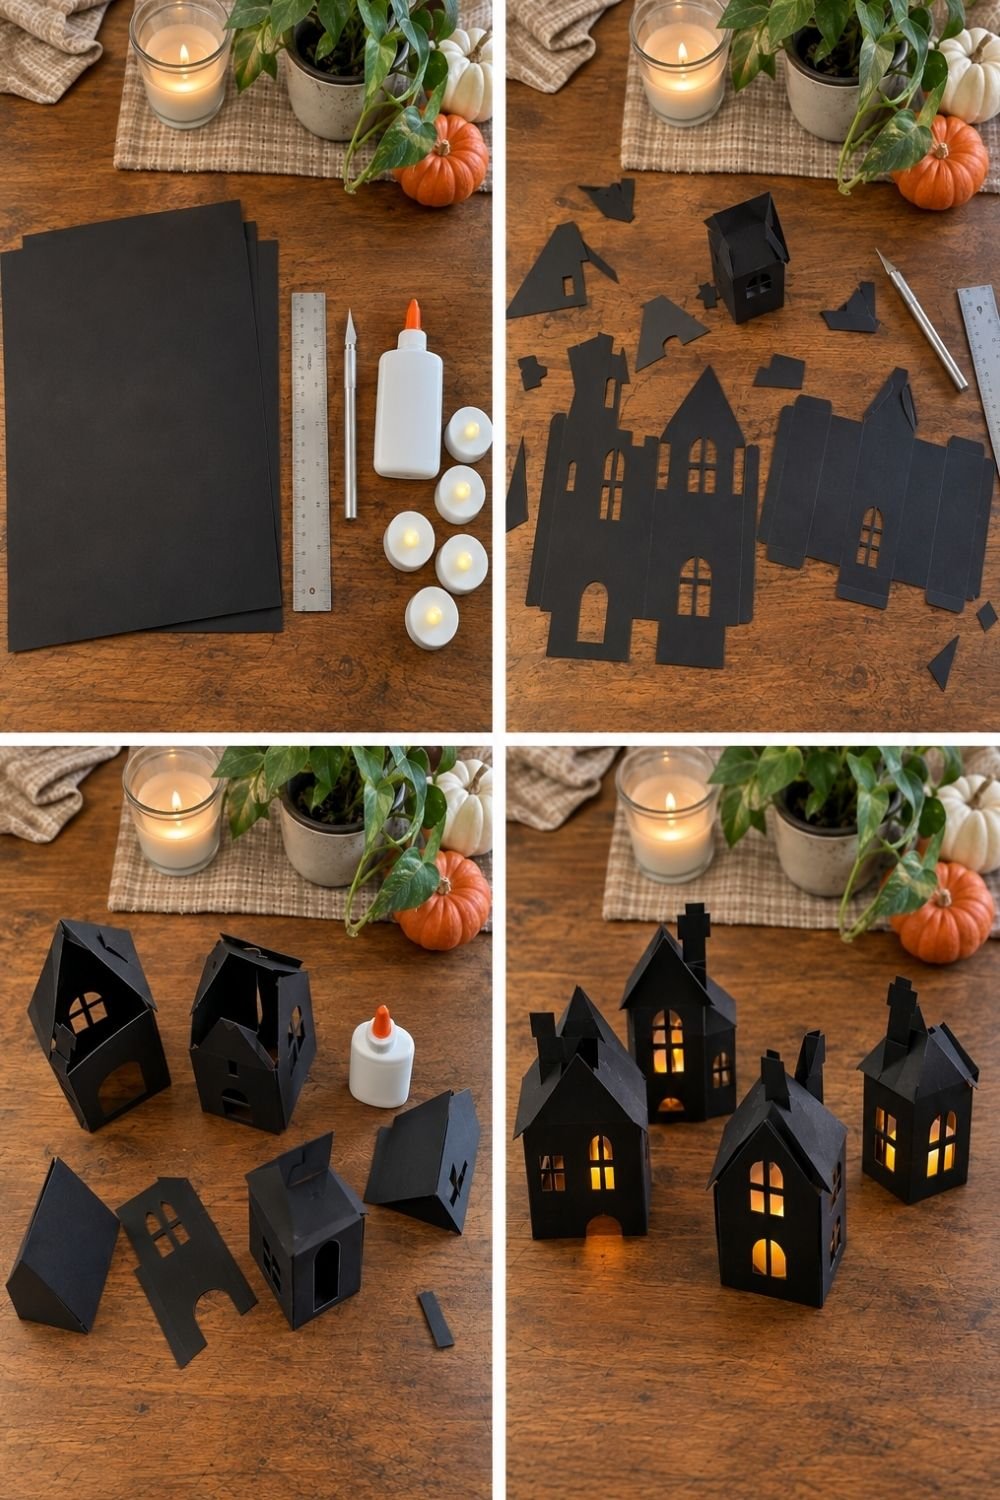
Photo by OurHoneyHome
- Cut the pieces. Print or draw a simple house template (walls with folding tabs, a separate roof, a chimney) on black card stock. Cut the outlines with scissors and the windows and doors with a craft knife against a metal ruler.
- Fold and glue. Score the fold lines with the back of the knife, fold the walls into a box and glue the tabs. Let the glue set before adding the roof.
- Add the roofs and chimneys. A few houses with pointed roofs and crooked chimneys look more haunted than a row of identical ones.
- Light them from inside. Set an LED tealight inside each house and turn off the overhead light.
Use only battery-operated LED tealights in paper houses, never candles with a flame. Paper and an open flame in a small closed space is exactly how a Halloween decoration turns into a fire. A craft knife isn’t a job for small kids either; let them do the gluing while an adult does the cutting.
A gothic mantel from thrifted frames and candlesticks
For a darker, more grown-up look, thrift store frames and candlesticks can be turned into a gothic mantel with one pot of black paint.
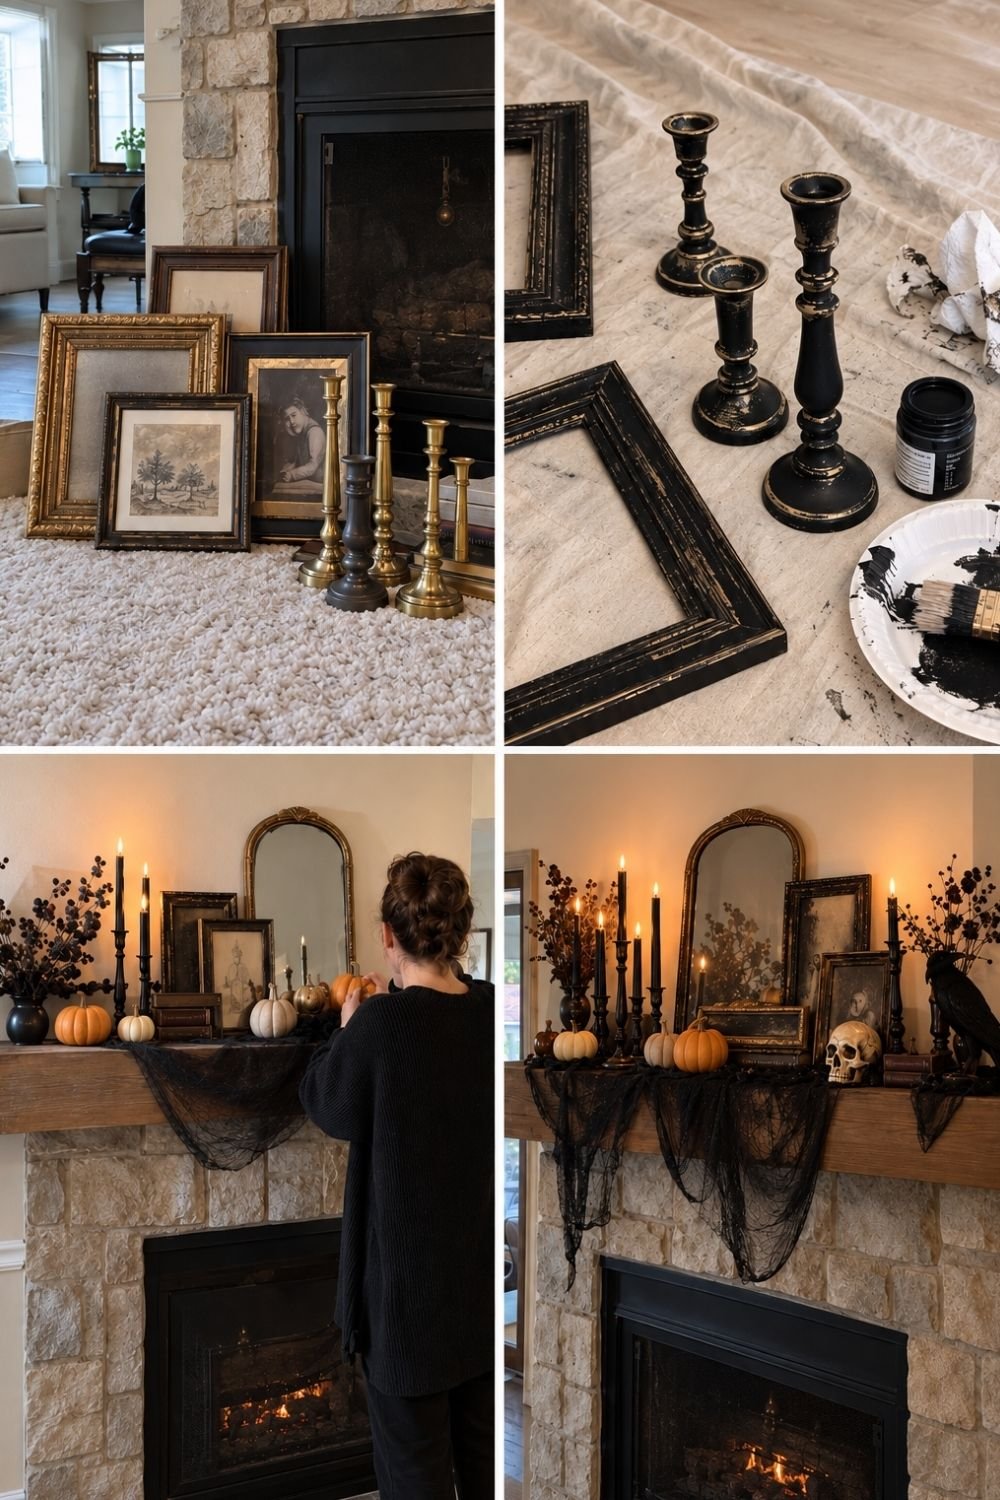
Photo by OurHoneyHome
- Collect the pieces. Gilded and wooden frames with old prints or portraits, and brass or wooden candlesticks in different heights. Thrift stores and yard sales are full of them.
- Paint them black. Brush on black chalk-finish or acrylic paint, then wipe or dry-brush some of it off the raised edges so a little gold shows through. It looks aged instead of freshly painted. Work on a drop cloth in a ventilated room.
- Build the mantel. Lean the frames against an arched mirror, add black taper candles in the painted candlesticks, dark branches in black vases and a few small pumpkins in orange, cream and gold.
- Finish with the spooky details. Black cheesecloth or creepy cloth draped along the front edge, a faux skull, a raven and a stack of old books.
The frames you paint can stay black after Halloween or get a new coat of gold in November. Either way, they’re yours for next year.
Putting the porch together with DIY Halloween decorations
The porch is where the DIY Halloween decorations meet a few store-bought basics. The trick is to build height, add light, and then let the homemade pieces fill the gaps.
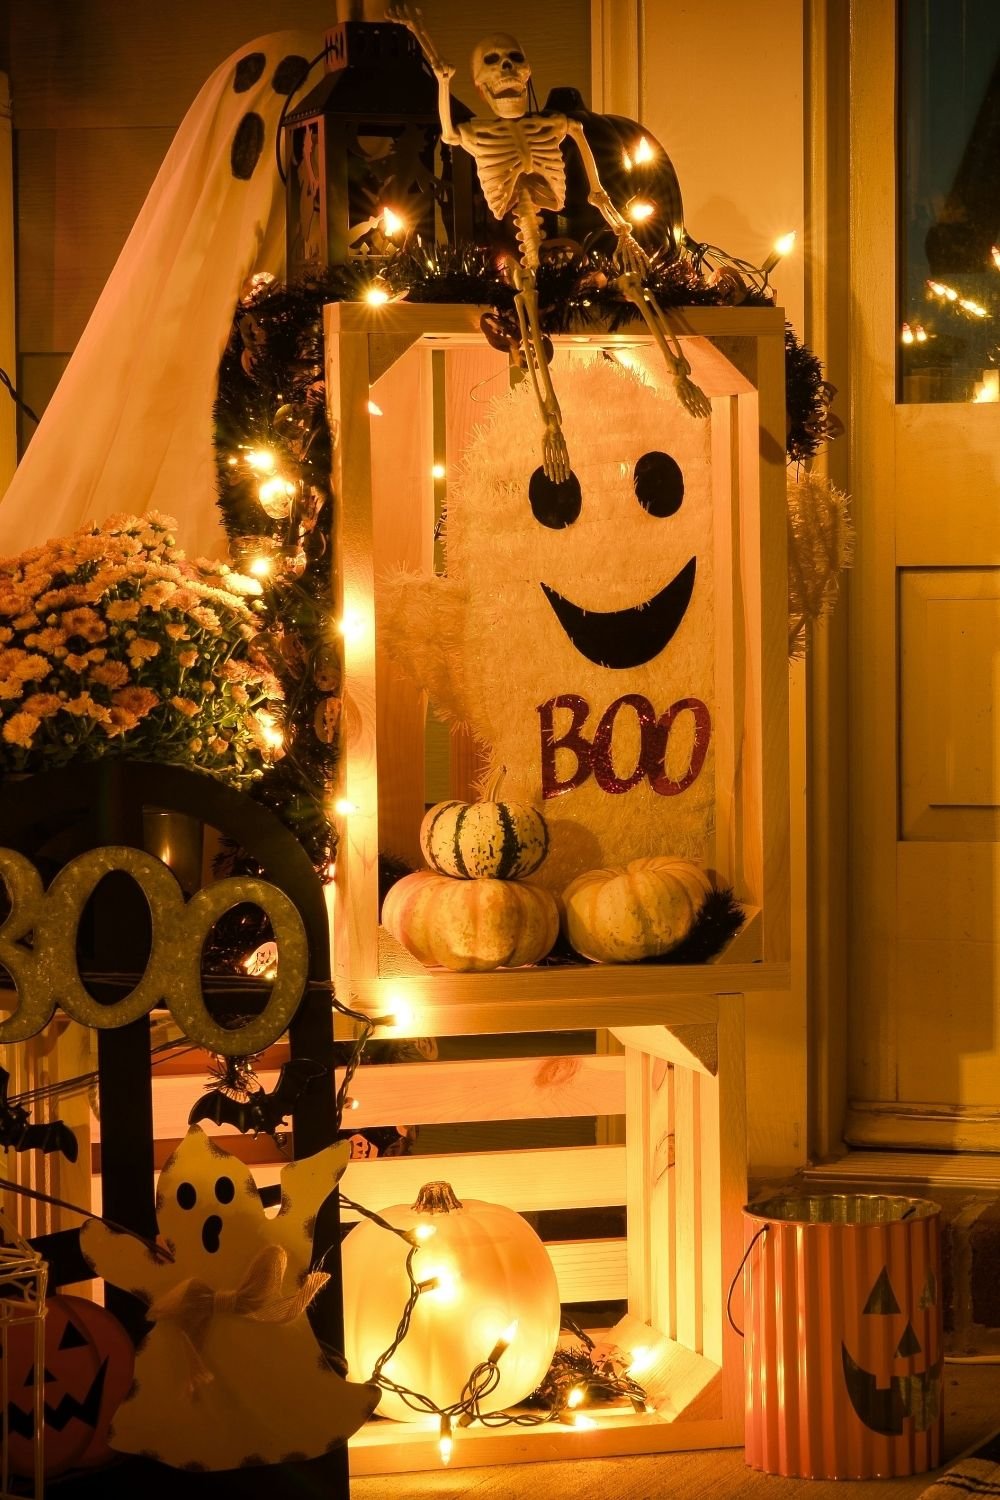
Photo by Clint Patterson on Unsplash
This porch corner starts with two unfinished wooden crates stacked on their sides, which instantly give the display height and a place to put things. Inside the top crate: a fuzzy white ghost sign that says “BOO,” with a few small striped and white pumpkins at its feet. On top: a small skeleton, a black lantern and a tinsel garland. A string of warm white lights winds around everything, a pot of orange mums fills one side, and a sheet ghost stands behind. At the bottom, a white pumpkin glows inside the lower crate, and a painted jack-o’-lantern bucket waits for candy.
To borrow the idea:
- Stack crates or a small step stool to get two or three levels. Flat displays disappear from the street.
- Wrap it in string lights. Use lights rated for outdoor use, and plug them into an outdoor outlet.
- Mix store-bought and homemade. Mums and pumpkins from the store, cheesecloth ghosts, a bat garland and a spider web hoop from your table.
- Keep the path clear. Trick-or-treaters come in the dark, often in costumes they can’t see well in, so keep steps and walkways free of cords and decor.
Pick a theme for your DIY Halloween decorations
Choosing one direction keeps DIY Halloween decorations from looking like a craft store explosion:
- Vintage Halloween: orange and black paper garlands, old-fashioned jack-o’-lanterns, scarecrows, crepe paper and honeycomb decorations.
- Spooky and haunted: cheesecloth everywhere, the paper village, candles (flameless), skeletons and dark branches.
- Cute: pumpkin garlands, friendly ghosts, smiling jack-o’-lanterns and lots of orange. The best choice for homes with small kids.
- Gothic: black paint, gold frames, ravens, skulls, dark florals and taper candles.
- Minimal: only black and white. Paper bats on a white wall, white pumpkins and black candlesticks.
After Halloween
On November 1, most of this can go straight back into a box: a flat folder for the paper bats and garlands, tissue paper around the paper houses, and the ghosts rolled loosely so the cheesecloth doesn’t crush. Label the box, and next year’s decorating takes an hour instead of a weekend.
Some pieces can stay out a little longer. The pumpkin garland, the mums and any uncarved pumpkins carry on into fall, and the painted candlesticks can move to the dining table for Thanksgiving with a new ribbon.
DIY Halloween decorations don’t need a big budget: a few sheets of card stock, a ball of yarn and one thrift store run are enough to make the whole house look haunted, and all of it fits in one box when the season’s over.
